
Making baked stuffed mushrooms isn’t about presentation perfection; it’s about capturing that warm, familiar feeling of a dish passed down in a kitchen filled with laughter and a little chaos. These mushrooms, with their slightly uneven tops and rustic stuffing, remind me of family gatherings where everyone pitches in, no matter how messy it gets. It’s a recipe that embraces imperfection, just like life around my table.
There’s something honest about the way these mushrooms cook—how their edges soften and turn golden, releasing a faint earthy aroma that mingles with the buttery, cheesy stuffing. It’s a dish that doesn’t need fancy tricks, just good ingredients and a little patience. I love how the aroma alone can spark memories of shared meals and quiet Sunday afternoons, making this a comfort food that’s as much about tradition as it is about savoring the moment.
Focusing on the underrated charm of making baked stuffed mushrooms that feel like a cozy, imperfect family recipe passed down through generations, emphasizing the comfort and nostalgia over perfection.
The story behind this recipe
- This recipe was born out of my early days of cooking with my grandmother, who had a knack for turning simple ingredients into comforting bites. I remember her gently stuffing mushrooms while telling stories, the aroma of garlic and herbs filling the kitchen, making everything feel cozy and familiar. Over the years, I’ve tweaked her method, adding my own touches, but that nostalgic warmth remains at its core.
- What keeps me coming back to this dish is how imperfectly perfect it feels—like a messy, loving family recipe that’s been passed down and adapted over generations. It’s a humble dish that invites everyone around the table, whispering stories of shared meals and quiet Sunday afternoons. Every time I make these, I’m reminded that sometimes, the simplest foods carry the deepest memories.
- heading
- story_type
Ingredient breakdown: key components
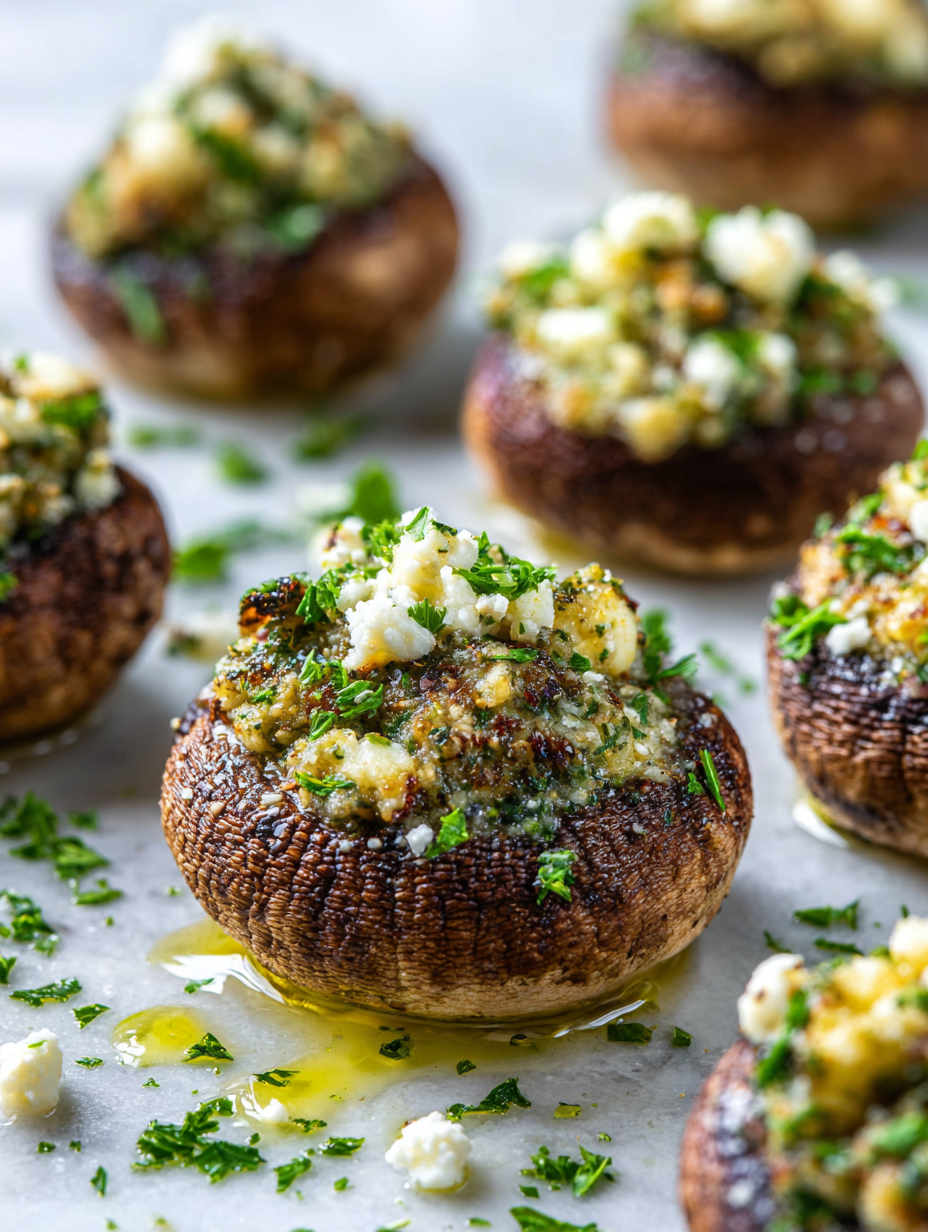
- Fresh cremini mushrooms: I choose these for their meaty texture and deep flavor, but button mushrooms work fine if that’s what you have. Look for firm, unblemished caps that are not slimy.
- Cream cheese: I like it soft and spreadable, which helps it meld into the stuffing smoothly. Try mascarpone if you want a richer, silkier finish, but keep an eye on the moisture level.
- Breadcrumbs: I use toasted panko for crunch, but regular fresh breadcrumbs can work if toasted well. The crunch adds a nice contrast to the tender mushroom caps and cheesy filling.
- Garlic and herbs: I love a generous clove of garlic and fresh parsley for brightness. If you’re out of parsley, chives add a lovely mild onion note that lifts the stuffing.
- Grated cheese: I go for sharp Parmesan or Pecorino for that punch of umami, but a milder mozzarella can mellow the overall flavor if you prefer it creamier and less salty. Add it towards the end for a gooey top.
- Olive oil: I drizzle a little over the mushrooms before baking to encourage crisp edges and add a subtle fruity aroma. Use good-quality extra-virgin for the best flavor.
- Lemon zest: I add this for a pop of brightness that cuts through the richness. It’s especially good if your filling feels a touch heavy—just a hint can lift the whole dish.
Spotlight on key ingredients
Mushrooms and Cream Cheese:
- Fresh cremini mushrooms: I pick these for their earthy, meaty bite and firm texture. Look for caps that are unblemished and dry, not slimy. They shrink slightly as they cook, so buy a bit extra.
- Cream cheese: I prefer it soft and spreadable, which helps it blend smoothly into the stuffing. It melts into a rich, creamy consistency that clings to the mushroom caps beautifully. If you want a tangier flavor, try swapping in mascarpone or ricotta.
Notes for ingredient swaps
- Dairy-Free: Swap cream cheese for coconut cream or cashew-based cheese. Keep in mind, the flavor will shift to a richer, nuttier profile.
- Breadcrumbs: Use crushed almond flour or crushed cornflakes for crunch. They add a different texture but still give that crispy top.
- Cheese: Substitute Parmesan with nutritional yeast or a sharp aged cheddar for different umami notes. Cheddar melts a bit creamier.
- Herbs: Fresh parsley can be replaced with basil or thyme if you prefer a different aromatic lift. Dried herbs work in a pinch but are less vibrant.
- Olive Oil: Use melted butter or avocado oil for a richer or milder flavor. The aroma will change slightly but still promote good browning.
- Mushrooms: Portobello caps can be a hearty alternative; they’re larger and meatier, giving a different texture and appearance.
- Lemon Zest: Lime zest or a splash of vinegar can add brightness if lemon isn’t available. The tang will be slightly different but still fresh.
Equipment & Tools
- Skillet: To sauté mushroom stems and garlic, developing flavor.
- Mixing bowl: To combine stuffing ingredients evenly.
- Spoon or small scoop: For filling mushroom caps neatly and generously.
- Baking dish: To hold the stuffed mushrooms during baking.
- Oven: For perfectly baking and crisping the stuffing.
Step-by-step guide to baked stuffed mushrooms
- Preheat your oven to 190°C (375°F). Gather a baking dish large enough to hold all mushrooms snugly.
- Clean the mushrooms gently with a damp cloth. Remove stems and chop finely; set caps aside.
- Heat a skillet over medium heat. Add a drizzle of olive oil and sauté the chopped mushroom stems with minced garlic until fragrant, about 3-4 minutes. Let cool slightly.
- In a mixing bowl, combine the sautéed stems, cream cheese, toasted breadcrumbs, chopped parsley, grated Parmesan, lemon zest, salt, and pepper. Mix until well incorporated.
- Spoon generous amounts of stuffing into each mushroom cap, pressing lightly to fill evenly. Arrange stuffed caps in the baking dish.
- Drizzle a little olive oil over the stuffed mushrooms. Bake in the oven for 20-25 minutes, until the tops are golden and bubbling.
- Check for doneness: the stuffing should be hot and slightly crispy on top, mushrooms tender but not shriveled, and the aroma inviting.
- Remove from oven and let rest for 5 minutes. Garnish with extra parsley or a squeeze of lemon if desired.
- Serve warm, directly from the dish, with a side of crusty bread or a simple salad.
Let the mushrooms rest for 5 minutes after baking to settle. Serve directly from the dish, garnished as desired, to enjoy the full aroma and texture.
How to Know It’s Done
- Golden brown tops and edges, indicating crispness and caramelization.
- Filling is hot and slightly jiggly but not runny, showing it’s cooked through.
- Mushrooms are tender when pierced with a fork, with a fragrant, savory aroma.
Baked Stuffed Mushrooms
Ingredients
Equipment
Method
- Preheat your oven to 190°C (375°F) and prepare a baking dish to hold the mushrooms.
- Gently wipe the mushrooms clean with a damp cloth. Carefully remove the stems and set the caps aside.
- Chop the mushroom stems finely and set them aside. In a skillet over medium heat, add a splash of olive oil and sauté the chopped stems with minced garlic until fragrant and slightly caramelized, about 3-4 minutes. This releases their earthy aroma and deepens the flavor.
- In a mixing bowl, combine the sautéed stems and garlic with cream cheese, toasted breadcrumbs, chopped parsley, grated Parmesan, lemon zest, salt, and pepper. Mix until the ingredients are evenly incorporated and form a cohesive stuffing.
- Use a spoon or small scoop to fill each mushroom cap generously with the stuffing, pressing lightly to pack it in. Arrange the stuffed caps in your prepared baking dish.
- Drizzle a little olive oil over the stuffed mushrooms to help them crisp and brown nicely. Place the dish in the oven and bake for 20-25 minutes, until the tops are golden and bubbling with aromatic goodness.
- Once baked, check that the mushrooms are tender when pierced with a fork and that the stuffing is hot and slightly crispy on top. Let the mushrooms rest for 5 minutes to allow the flavors to settle.
- Garnish with extra parsley or a squeeze of lemon for a fresh finish. Serve warm directly from the dish to enjoy the comforting aroma and rustic presentation.
Pro Tips for Perfect Stuffed Mushrooms
- Bolded Mini-Head: Use a gentle hand when filling the mushroom caps to avoid breaking the fragile edges.
- Bolded Mini-Head: Toast breadcrumbs until golden and slightly crispy—this enhances crunch and adds nutty flavor.
- Bolded Mini-Head: Sauté stems and garlic until fragrant and slightly caramelized—this deepens the stuffing’s savory notes.
- Bolded Mini-Head: Drizzle olive oil over stuffed mushrooms before baking to promote even browning and crispy edges.
- Bolded Mini-Head: Check for doneness by ensuring tops are golden and bubbling, with mushrooms tender but not shriveled.
- Bolded Mini-Head: Rest baked mushrooms for 5 minutes; this helps the filling set and prevents hot spills when serving.
- Bolded Mini-Head: For a smoky flavor, sprinkle a tiny pinch of smoked paprika on top before baking.
Common mistakes and how to fix them
- FORGOT to remove mushroom stems before stuffing? Save them for sautéing to add flavor.
- DUMPED filling into caps too quickly? Use a small spoon for controlled, even stuffing.
- OVER-TORCHED mushrooms? Cover with foil halfway through to prevent burning.
- MISSED the resting step? Let stuffed mushrooms rest 5 minutes for juices to settle.
Quick fixes and pantry swaps
- When mushrooms release excess moisture, splash a little lemon juice to brighten and dry them quickly.
- If stuffing is too runny, patch with a spoonful of extra breadcrumbs for better consistency.
- When tops aren’t browning, shield with foil and increase oven temperature for a few minutes.
- Splash a pinch of smoked paprika if mushrooms turn too pale or bland during baking.
- Dumped in too much filling? Rescue with a spoon and spread it out evenly for a tidy finish.
Prep, store, and reheat tips
- Prep the stuffing mixture up to 24 hours in advance; keep covered in the fridge. The flavors meld nicely overnight and save time on the day of baking.
- Assemble the stuffed mushrooms a few hours ahead, then refrigerate in an airtight container. The mushrooms may release a bit of moisture, so drain excess before baking.
- Shelf life: Store baked stuffed mushrooms in the fridge for up to 2 days. Reheat gently to avoid drying out the filling—use a low oven or microwave, checking for warmth and aroma.
- Reheating: Bake at 160°C (320°F) for about 10 minutes or until heated through, or microwave on medium power, watching for a soft, fragrant finish. The cheese should be gooey and the mushrooms tender, not shriveled.
Top questions about baked stuffed mushrooms
1. How do I choose the best mushrooms?
Look for firm, unblemished caps without sliminess. Gently wipe with a damp cloth instead of rinsing to avoid sogginess.
2. Can I make the stuffing in advance?
Yes, you can prepare the stuffing ahead of time and refrigerate for up to a day. Assemble right before baking for best freshness.
3. How do I know when they’re done?
Bake at 190°C (375°F) for 20-25 minutes until tops are golden and bubbling. Check that mushrooms are tender and filling is hot.
4. How do I fill the mushrooms properly?
Use a spoon or small scoop to fill mushroom caps evenly without overstuffing, which can cause overflow during baking.
5. Can I substitute the cheese?
You can substitute with vegetarian cheeses like mozzarella or vegan options, but flavor and meltiness might change slightly.
6. What if they start to burn?
To prevent burning, cover the mushrooms loosely with foil halfway through baking if they brown too quickly.
7. How do I check if mushrooms are cooked?
Use a small knife or skewer to test if mushrooms are tender—should glide in easily without resistance.
8. How can I boost flavor after baking?
Add a squeeze of lemon or a sprinkle of fresh herbs after baking for extra brightness and flavor.
9. How long do leftovers last?
Store leftovers in an airtight container in the fridge for up to 2 days. Reheat gently in the oven or microwave.
10. What if my stuffing is too runny?
If stuffing feels too loose, mix in a little more breadcrumbs or cream cheese to firm it up before filling.
Making these baked stuffed mushrooms feels like a small act of comfort that sticks with you. The smell of garlic and cheesy richness, filling the kitchen, reminds me why I keep coming back to simple, honest recipes. They’re not perfect, but they’re always satisfying in that unpretentious way that makes every bite feel like a little celebration.
In the end, this dish is about more than just flavor; it’s about the memories and imperfect moments shared around the table. Every time I make them, I get a little nostalgic for family dinners and slow weekends. It’s a dish that’s easy to love, especially when you need something cozy and straightforward.

