Baked vegetable fritters might sound simple, but they’re surprisingly versatile and forgiving. I love turning whatever vegetables I have in the fridge into something crispy and satisfying, especially on lazy weekends when I want comfort food without the fuss of frying. Baking keeps them light but still gives that satisfying crunch I crave.
There’s something honest about these fritters—they’re humble, straightforward, and built from ingredients I usually keep stocked. No fancy equipment needed; just a bowl, a baking sheet, and a little bit of patience. Plus, they’re perfect for sneaking in extra veggies without anyone noticing, which makes them a real win in my house.
This recipe focuses on turning humble garden vegetables into crispy, satisfying fritters that are perfect for lazy weekend mornings or a quick brunch burst, emphasizing honest, straightforward cooking with ingredients I always have on hand.
The story behind this recipe
- This recipe came together one rainy afternoon when I was rummaging through the fridge, looking for something to make that wasn’t complicated or greasy. I remembered how my grandma used to bake veggie patties that were crispy on the outside and tender inside, and I wanted to replicate that without frying. Baked fritters felt like a perfect way to honor that memory—simple, honest, and satisfying.
- I started experimenting with whatever vegetables I had—zucchini, carrots, and a bit of onion—and found that baking really brought out their natural sweetness and kept the texture just right. There’s a messy charm to mixing everything by hand, feeling the textures change as the batter comes together. It’s a quiet, almost meditative process that reminds me how humble ingredients can turn into something special.
- heading
- story_type
Key Ingredients and Tips
- Carrots: I love the slight sweetness they bring and their firm bite. Grate them finely so they blend smoothly into the batter, avoiding a soggy fritter.
- Zucchini: It’s my go-to for moisture, but I always squeeze out excess water after grating. Too much liquid and the fritters fall apart or steam instead of crisp up.
- Eggs: They hold everything together, but if you want a vegan version, mashed potatoes or flaxseed work. Just note the texture might be slightly denser.
- Flour: I use all-purpose, but chickpea flour adds a nutty flavor and extra protein. Adjust quantity if your batter feels too loose or dry.
- Herbs & Spices: Fresh parsley and a pinch of cumin make a world of difference. Smell that bright, herbal aroma as they bake—it’s the sign they’re ready.
- Olive Oil: I brush the tops before baking for a golden finish and a subtle smoky note. Skip if you prefer a completely oil-free version, but expect less crispness.
- Salt & Pepper: Essential for flavor, don’t be shy—tasting the batter before baking helps avoid bland fritters.
Spotlight on key ingredients
Carrots:
- Their natural sweetness brightens each bite and adds a tender, slightly crisp texture. Grate them finely to avoid sogginess, and squeeze out excess moisture for crispness.
- Zucchini: Moisture-rich with a mild, fresh flavor. Squeeze out excess water after grating to prevent the fritters from steaming instead of crisping up, ensuring a golden exterior.
Herbs & Spices:
- Eggs: They act as the binder, giving the fritters structure and a tender crumb. If you want vegan, mashed potatoes or flaxseed work, but expect a slightly different texture.
- Fresh parsley or cilantro add bright, herbal notes. When baking, the aroma should be lively and green, signaling they’re infused with freshness.
Notes for ingredient swaps
- Dairy-Free: Use plant-based milk instead of eggs for binding, but expect a slightly softer texture.
- Gluten-Free: Swap all-purpose flour for rice or tapioca flour; fritters may be a bit crisper but less sturdy.
- Low-Sodium: Reduce salt and opt for herbs like basil or thyme to boost flavor without added salt.
- Vegan: Replace eggs with mashed avocado or flaxseed meal mixed with water; batter might be a touch denser.
- Herb Variations: Fresh dill or cilantro can replace parsley for a different aromatic punch, especially in summer.
- Oil Alternatives: Brush with sesame oil or avocado oil before baking for a richer, nutty flavor.
- Vegetable Swaps: Sweet potatoes or parsnips can replace carrots for a sweeter, earthier taste.
Equipment & Tools
- Baking sheet: To bake the fritters evenly
- Parchment paper or silicone mat: Prevent sticking and facilitate cleanup
- Grater: Shred vegetables uniformly
- Mixing bowl: Combine ingredients thoroughly
- Spoon or scoop: Portion out the batter neatly
Step-by-step guide to baking fritters
- Preheat your oven to 200°C (390°F). Line a baking sheet with parchment paper or a silicone mat for easy cleanup.
- Prepare your vegetables: Finely grate 1 cup of zucchini, 1 cup of carrots, and ½ cup of onion. Place grated veggies in a clean kitchen towel and squeeze out excess moisture. This prevents sogginess and helps crisp the fritters.
- In a large mixing bowl, combine the grated vegetables. Add 1 beaten egg and ½ cup of all-purpose flour. Mix well until everything is evenly coated. If the batter feels too loose, sprinkle in a little more flour; if too stiff, add a splash of water.
- Season the mixture with salt, pepper, and your favorite herbs (a tablespoon of chopped parsley works well). Adjust seasoning to taste. The batter should be thick but scoopable.
- Using a tablespoon or small ice cream scoop, portion out the batter onto the prepared baking sheet. Gently flatten each mound with the back of the spoon or your fingers to form small patties about 1.5 cm (0.6 inches) thick.
- Bake in the oven for 20–25 minutes. After 10 minutes, check the fritters and rotate the baking sheet for even browning. They should turn a golden brown and smell toasty around the edges.
- For extra crispness, broil the fritters for the last 2–3 minutes, watching carefully to prevent burning. They should be crispy on the outside and tender inside.
- Remove from oven and let them rest for 5 minutes. This helps them firm up and prevents breaking when you serve. Serve warm, perhaps with a dollop of yogurt or a squeeze of lemon.
Let the baked fritters rest for 5 minutes on a cooling rack. This helps set their shape and keeps them crisp when served. Plate with your favorite sides or dips, and enjoy while warm.
How to Know It’s Done
- Fritters are golden and crispy on the edges.
- The batter holds together without breaking apart when shaped.
- Fritters emit a toasty, veggie aroma and feel firm but tender when gently pressed.

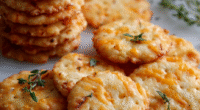
Baked Vegetable Fritters
Ingredients
Equipment
Method
- Start by preheating your oven to 200°C (390°F) and lining a baking sheet with parchment paper or a silicone mat to prevent sticking.
- Grate the zucchini, carrots, and onion finely, then transfer them to a clean kitchen towel or paper towels and squeeze out as much excess moisture as you can. This step helps the fritters stay crispy and prevents sogginess.
- In a large mixing bowl, combine the grated vegetables with the beaten egg, flour, chopped parsley, and a pinch of salt and pepper. Mix everything thoroughly until the mixture is well combined and holds together when pressed.
- Using a tablespoon or small scoop, portion out the mixture onto the prepared baking sheet. Gently flatten each mound with the back of the spoon or your fingers to form small, even patties about 1.5 cm thick.
- Brush the tops of each fritter lightly with olive oil to help them turn golden and crispy during baking.
- Bake in the oven for 20–25 minutes, turning the sheet halfway through to promote even browning. The fritters should turn a beautiful golden brown and smell toasty around the edges.
- If you want extra crispiness, switch to broil mode for the last 2–3 minutes, keeping a close eye to prevent burning. The tops should be crispy and fragrant.
- Remove the fritters from the oven and let them rest for 5 minutes on a cooling rack. This helps them firm up and stay crispy when served.
- Serve the baked vegetable fritters warm, perhaps with a dollop of yogurt or a squeeze of lemon for added flavor and freshness.
Pro tips for perfect fritters
- Bolded mini-head: Use a light touch when mixing; overworking the batter can make fritters dense.
- Bolded mini-head: Keep the vegetables cold after grating; it helps maintain their texture and prevents sogginess.
- Bolded mini-head: For extra crispness, refrigerate shaped fritters for 10 minutes before baking.
- Bolded mini-head: Brush the tops with oil before baking to enhance browning and add a smoky aroma.
- Bolded mini-head: Rotate the baking sheet halfway through baking to ensure even color and crispness.
- Bolded mini-head: For a more tender interior, bake at 180°C (355°F) for a slightly longer time, about 5 minutes.
- Bolded mini-head: If fritters stick during flipping, loosen with a thin spatula and add a splash of water to the batter for moisture.
Common mistakes and how to fix them
- FORGOT to squeeze excess moisture from vegetables → Squeeze out water to prevent sogginess.
- DUMPED batter directly onto baking sheet → Use a scoop and flatten for even cooking.
- OVER-TORCHED fritters → Broil briefly at the end for crispness, not burning.
- MISSED checking doneness → Look for golden edges and firm texture before removal.
Quick fixes and pantry swaps
- When batter feels too loose, add a splash more flour for stability.
- Splash cold water on soggy vegetables to help squeeze out excess moisture.
- Patch over burnt edges with a quick brush of oil and a few extra minutes in the oven.
- Shield delicate fritters with foil if they brown too quickly before cooking through.
- Rescue cracked or broken fritters by gently pressing them back together with a spatula, then bake longer.
Prep, store, and reheat tips
- Prepare the vegetable mixture a day ahead; keep chilled to enhance flavor and texture.
- Store baked fritters in an airtight container in the fridge for up to 2 days—reheat until crisp and fragrant, about 5 minutes at 180°C (355°F).
- Fritters can be frozen for up to 1 month; reheat directly from frozen for best crispness, adding a few extra minutes in the oven.
- Reheating fills the kitchen with toasty, veggie aroma; expect a slightly softer texture but still enjoy that satisfying crunch.
Top questions about vegetable fritters
1. How do I prevent soggy fritters?
Use a fine grater and squeeze out as much water as possible from the vegetables to keep the batter firm and prevent sogginess.
2. Can I freeze baked vegetable fritters?
A quick freeze for 10-15 minutes before baking helps maintain shape and improves crispness without extra oil.
3. How do I know when the fritters are done?
Adjust baking time if your fritters are not golden after 20 minutes; sometimes oven temps vary slightly.
4. My batter is too wet or too dry, what now?
If the batter feels too loose, add a bit more flour; if too stiff, a splash of water helps loosen it.
5. What’s the best way to prevent sticking?
Use parchment paper or a silicone baking mat to prevent sticking and make flipping or removing easier.
6. Can I make these vegan?
You can swap eggs for mashed avocado or flaxseed mixed with water, but expect a slightly denser texture.
7. How do I handle zucchini for crisp fritters?
Finely grate and squeeze out excess moisture from zucchini; too much water makes fritters soggy and limp.
8. How do I get crispy tops?
Baste the tops with a little oil before baking for added crispness and a golden finish.
9. Can I use dried herbs?
Use fresh herbs like parsley or cilantro for a bright flavor; dried herbs can work but are less vibrant.
10. My fritters are breaking apart, what can I do?
If the fritters crack or break, gently press them back together and bake a few extra minutes to set.
These baked vegetable fritters are a humble, honest dish that’s perfect for any season. They bring back memories of simple weekend mornings and make veggie snacking feel like a little celebration. I find myself returning to this recipe when I want something satisfying without the fuss, especially when I need a quick, nourishing bite.
In the end, it’s about the small pleasures—crisp edges, bright herbs, and that warm, baked aroma filling the kitchen. Nothing fancy, just good ingredients coming together in a way that feels honest and real. Sometimes, those simple bites turn into the best moments around the table.

