
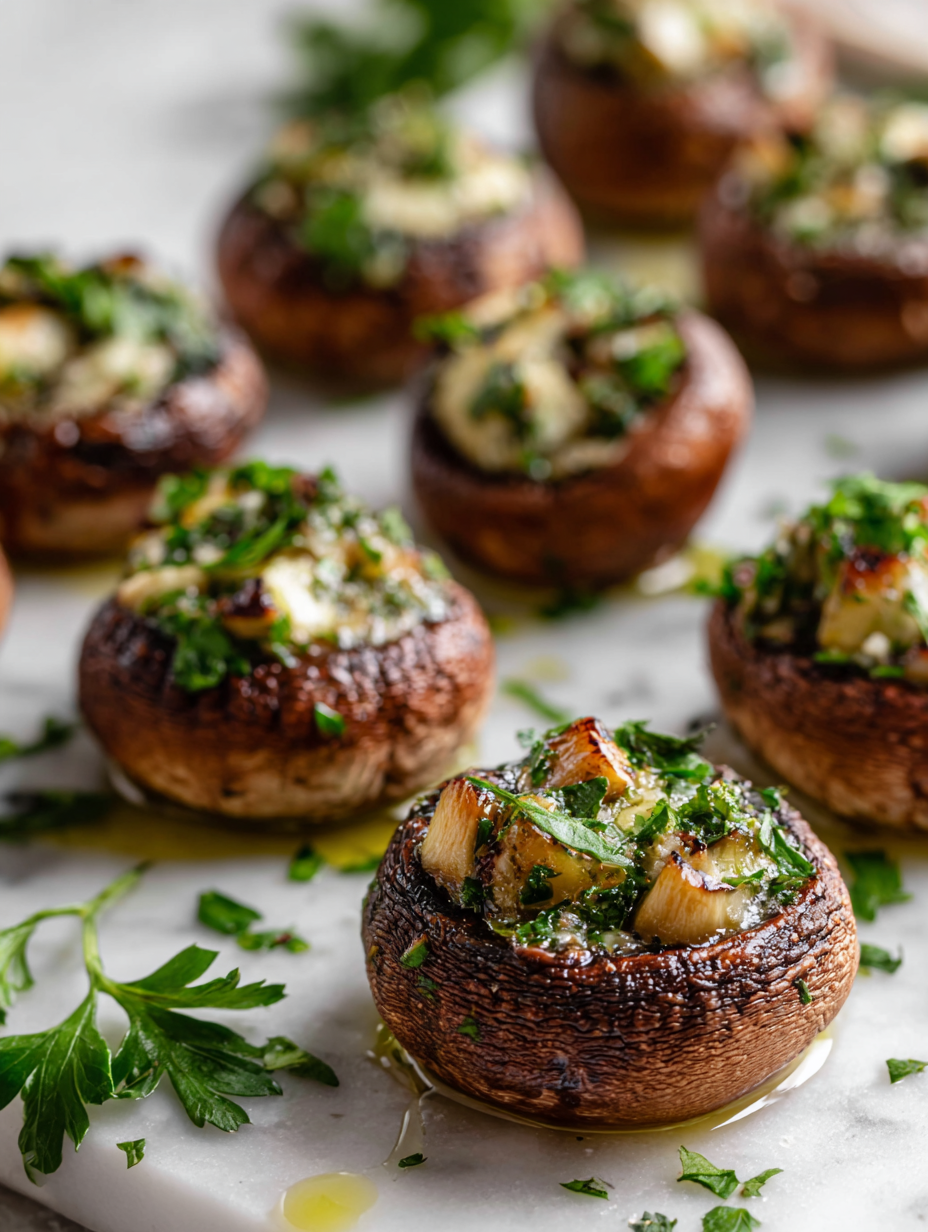
Mushroom caps often get overlooked as just a side dish or a salad topping, but I see them as a blank canvas waiting for a bit of love. Their natural umami and earthy aroma can shine through if you treat them right, especially when baked until tender and slightly caramelized. It’s a simple pleasure, really—something honest and unpretentious, yet deeply satisfying.
I first started playing with baked mushroom caps on a quiet weekend, just tossing ingredients I had on hand—garlic, herbs, a splash of lemon. Watching those caps shrink a little but turn into a smoky, oozing bite was a small revelation. It’s not about fancy ingredients; it’s about respecting their natural charm and giving them that gentle, warm finish.
Focusing on the overlooked beauty of mushroom caps as a blank canvas, this recipe transforms what many see as just a side into a centerpiece, highlighting their natural umami and texture with a simple, homely approach.
The story behind this recipe
- One rainy Saturday, I was rummaging through my pantry, looking for something comforting but simple. I remembered a batch of wild mushrooms I picked last fall, stored away in the freezer. The idea of roasting their earthy richness until they shrank and caramelized felt like a cozy secret worth sharing.
- This recipe came about when I wanted to elevate those humble caps without fuss—just a sprinkle of garlic, a splash of lemon, and a bit of cheese. Watching the mushrooms turn tender and oozy, I realized it’s about celebrating that deep umami and making it the star of the plate. It’s honest, unpretentious, and perfect for a quick bite.
- heading: The story behind this recipe
Ingredient breakdown
- Cremini or baby bella mushrooms: I love their firm, meaty texture and deep, earthy aroma; skip if you want a milder flavor, but don’t expect the same richness.
- Garlic: I use freshly minced garlic for that pungent, fragrant kick that intensifies as it roasts; if you prefer milder, reduce the amount or sauté it first.
- Olive oil: I drizzle generously to help the caps caramelize and keep them juicy; use good quality oil for a richer, fruity note or a neutral one if you prefer less pronounced flavor.
- Lemon juice: I squeeze fresh lemon over before baking for brightness; skip if you want a milder, more savory profile, but don’t miss that pop of zesty freshness.
- Parmesan or Pecorino: I sprinkle on top for a salty, umami finish; for a dairy-free version, skip or use nutritional yeast—still quite tasty but less cheesy.
- Fresh herbs (parsley, thyme): I add at the end for a burst of herbal freshness; dried herbs can work in a pinch but won’t give that bright, fresh aroma.
- Breadcrumbs (optional): I toss them with a little oil and herbs for crunch; skip if you want a softer, more delicate bite, or use crushed nuts for a different texture.
Spotlight on key ingredients
Cremini mushrooms:
- I love their firm, meaty texture and deep, earthy aroma; skip if you want a milder flavor, but don’t expect the same richness.
- Garlic: I use freshly minced garlic for that pungent, fragrant kick that intensifies as it roasts; if you prefer milder, reduce the amount or sauté it first.
Olive oil and lemon juice:
- Olive oil: I drizzle generously to help the caps caramelize and keep them juicy; use good quality oil for a richer, fruity note or a neutral one if you prefer less pronounced flavor.
- Lemon juice: I squeeze fresh lemon over before baking for brightness; skip if you want a milder, more savory profile, but don’t miss that pop of zesty freshness.
Notes for ingredient swaps
- Dairy-Free: Use nutritional yeast instead of Parmesan for cheesy umami, but expect a nuttier flavor and less melt.
- Vegan: Swap out cheese for a plant-based alternative or skip altogether; the mushrooms still shine with their natural richness.
- Oil Options: Switch olive oil for avocado or grapeseed oil for a milder, less fruity note that still helps with caramelization.
- Herbs: Fresh thyme or parsley can be replaced with dried herbs, but you’ll lose some bright aroma; add a pinch more for flavor.
- Citrus: Lime juice can replace lemon for a slightly different tang, brighter and more tropical, especially good with spicy toppings.
- Breadcrumbs: Use crushed nuts or seeds for crunch if you want a different texture or are avoiding grains altogether.
- Stems: If you want a softer, more integrated stuffing, finely chop stems and sauté with garlic before stuffing.
Equipment & Tools
- Baking sheet: Holds the mushroom caps during baking
- Small spoon: Scooping out gills or stuffing mushrooms
- Brush or basting tool: Applying oil and seasonings evenly
- Sharp knife: Trimming stems and preparing mushrooms
Step-by-step guide to baked mushroom caps
- Preheat your oven to 200°C (400°F). Gather a baking sheet, a small spoon, and a sharp knife. Line the sheet with parchment for easy cleanup.
- Clean the mushroom caps gently with a damp cloth, removing any dirt. Pat dry thoroughly to prevent excess moisture.
- Trim the stems slightly if they’re long or tough, but keep most intact for stuffing or flavor. Scoop out a little of the gills if they seem too thick—this helps stuffing or toppings sit better.
- In a small bowl, mix 2 tablespoons olive oil, 2 minced garlic cloves, a pinch of salt, and a squeeze of lemon juice. Whisk until combined.
- Brush the mushroom caps generously with the garlic oil mixture, making sure to cover all surfaces. Place them stem-side down on the prepared baking sheet.
- Bake uncovered for 15 minutes, then flip the caps. Continue baking for another 10 minutes until edges are golden and caps are tender.
- Check for doneness: the caps should be soft to the touch, with a slight caramelization around the edges. The filling (if added) should be bubbling and slightly oozy.
- Remove from oven and let rest for 5 minutes. Sprinkle with freshly chopped herbs and grated cheese if using. Serve warm, with a squeeze of lemon for brightness.
Let the mushrooms rest for 5 minutes after baking to settle their juices. Garnish with herbs and a final squeeze of lemon. Plate directly on a serving dish for best presentation.
How to Know It’s Done
- Caps are soft and slightly caramelized around edges.
- Filling (if added) is bubbling and oozy.
- Aroma of garlic and herbs is fragrant and inviting.
Baked Mushroom Caps with Garlic and Herbs
Ingredients
Equipment
Method
- Preheat your oven to 200°C (400°F). Line a baking sheet with parchment paper for easy cleanup.
- Gently clean each mushroom cap with a damp cloth to remove dirt, then pat dry thoroughly. Trim any tough stems if needed, but leave most intact for flavor.
- In a small bowl, whisk together olive oil, minced garlic, and a squeeze of lemon juice until well combined. This will be your flavor brushing mixture.
- Using a brush or spoon, generously coat each mushroom cap all over with the garlic oil mixture, ensuring even coverage. Place them stem-side down on the prepared baking sheet.
- Bake the mushrooms uncovered for 15 minutes. You'll smell the earthy aroma intensify as they start to soften and edges turn golden.
- After 15 minutes, carefully flip each mushroom cap over using tongs or a spoon, then continue baking for another 10 minutes until they are tender and edges are nicely caramelized.
- Remove the mushrooms from the oven and let them rest for 5 minutes, allowing their juices to settle and flavors to deepen.
- Sprinkle grated Parmesan cheese and chopped fresh herbs over the warm mushrooms for a cheesy, fragrant finish. Add salt and pepper to taste before serving.
- Squeeze a little extra lemon juice over the top for brightness, then serve immediately. Enjoy these tender, flavorful mushroom caps as a satisfying main or side dish.
Notes
Pro tips for baked mushroom caps
- Use a hot oven (200°C/400°F) to encourage quick caramelization and tender caps.
- Brush with seasoned oil mixture thoroughly for even flavor and to prevent sticking.
- Flip the mushrooms halfway to ensure both sides get golden and cooked through.
- Watch for edges turning deep amber—this is your cue that they’re perfectly roasted.
- Rest mushrooms for 5 minutes after baking; this helps juices settle and enhances flavor.
- Add herbs and cheese after baking to preserve their bright aroma and fresh taste.
Common mistakes and how to fix them
- FORGOT to preheat the oven → Always preheat to ensure even baking and caramelization.
- DUMPED the stems into the trash → Save stems for chopping or adding to stuffing for extra flavor.
- OVER-TORCHED the mushroom caps → Remove when edges are golden and caps are tender, not burnt.
- SKIPPED drying the caps → Pat them dry thoroughly to prevent steaming and soggy texture.
Quick fixes and pantry swaps
- When mushrooms release excess moisture, splash a little lemon juice to brighten and help them caramelize.
- If caps are soggy, patch with a quick broil—just 2 minutes on high to crisp edges.
- Splash extra olive oil if the caps look dry before baking; it boosts flavor and juiciness.
- Dumped garlic burns? Shield it with foil during the last 5 minutes of roasting to prevent bitterness.
- When lacking fresh herbs, pantry swap with dried thyme or oregano for a herbal hint, just reduce quantity.
Prep, store, and reheat tips
- Prepare the mushroom caps: clean and trim stems a day ahead, then brush with oil mixture and refrigerate for up to 24 hours. The flavors deepen overnight, and the caps stay firm but tender.
- Assemble and bake in advance: bake the mushrooms until just tender, then cool completely. Reheat at 180°C (350°F) for 10-12 minutes until warmed through, with a slight aroma of garlic and herbs.
- Shelf life: stored in an airtight container in the fridge, baked mushroom caps stay good for 1-2 days. Expect the texture to soften slightly, but the flavors remain savory and rich.
- Reheating tips: warm gently in the oven to preserve texture. For best sensory results, add fresh herbs or a squeeze of lemon after reheating to brighten the flavors and revive some moisture.
Top questions about baked mushroom caps
1. What kind of mushrooms work best for this recipe?
Use large, fresh mushroom caps with firm texture. They hold up well to baking and develop a smoky aroma when cooked properly.
2. How do I get the mushroom caps to turn out tender and flavorful?
Brush the caps with a mixture of garlic, olive oil, and lemon juice before baking. This enhances flavor and promotes even caramelization.
3. What’s the optimal baking time and temperature?
Bake at 200°C (400°F) for about 25-30 minutes until edges are golden and caps are soft. Check for a slight jiggle and fragrant aroma.
4. How can I prevent soggy mushroom caps?
If the caps release too much moisture, increase the oven temperature slightly or broil for a minute to crisp edges.
5. When should I add cheese or herbs for the best flavor?
Add cheese or herbs after baking to keep their fresh aroma and vibrant flavor. Reheat gently to avoid overcooking.
6. Can I make this vegan or dairy-free?
Yes, you can substitute nutritional yeast or dairy-free cheese for a vegan option. The flavor will be less cheesy but still savory.
7. How should I store leftovers and reheat them?
Store baked mushroom caps in an airtight container in the fridge for up to 2 days. Reheat in the oven at 180°C (350°F) until warmed through.
8. Should I remove the gills or stems before baking?
Use a small spoon to scoop out any tough gills or stems if you want a cleaner presentation or to make stuffing easier.
9. What are the signs that the mushroom caps are fully cooked?
Watch for edges turning deep amber and caps becoming tender as signs they’re done. The aroma should be fragrant and inviting.
10. How do I prevent garlic from burning during baking?
If garlic starts to burn, shield it with foil or add it later in the baking process to prevent bitterness.
Baked mushroom caps have a quiet way of elevating a simple meal. Their smoky, juicy bite offers a grounding flavor that feels both nostalgic and surprisingly elegant. It’s the kind of dish that reminds me how honest ingredients often speak the loudest.
When you crack open that first tender, caramelized cap, it’s like a small revelation—earthy, bright, and deeply satisfying. No matter how many times I make these, they manage to feel special, especially when shared with someone who appreciates humble, well-cooked food.

