
Baking paneer for tikka might seem unusual at first, but it’s a game changer. The heat transforms the cheese, giving it a rich, smoky flavor that’s hard to get from quick sautéing or grilling. Plus, it’s so much easier to control—no flipping or tending the flame, just pop it in and forget about it for a bit.
I started experimenting with baked paneer tikka when I wanted something flavorful but low fuss, especially on busy weeknights. The oven’s gentle heat makes the paneer oozy on the inside while giving the edges a lovely char. It’s like a little smoky miracle happening right in your kitchen, without the need for a grill.
This method is a reminder that sometimes, taking a different route in the kitchen leads to surprises. The creamy texture is preserved, and the smoky notes deepen, making it perfect for when you want something familiar yet a bit more refined. It’s a simple tweak that makes all the difference, especially when grilling isn’t an option.
Focusing on how baking enhances the paneer’s creamy texture and smoky flavor, making it accessible for home cooks without a grill.
The story behind this recipe
- I stumbled upon baked paneer tikka quite by accident during a hectic week when I wanted something flavorful but didn’t want to stand over a hot grill. The oven’s gentle heat turned out to be perfect, giving the paneer a smoky, creamy edge I hadn’t expected.
- It reminded me that sometimes, the simplest changes—like baking instead of grilling—can unlock new layers of flavor. That first bite, with its tender inside and charred edges, was a revelation. Now I turn to this method whenever I crave something cozy and smoky without the fuss.
- heading’: ‘The story behind this recipe
Ingredient breakdown
- Paneer: I prefer firm, fresh paneer that holds its shape; look for one with a mild, milky aroma. If yours is crumbly, try pressing out excess moisture or choosing a slightly fresher block.
- Yogurt Marinade: I use thick Greek yogurt for a creamy coat and smoky flavor. If you want a tangier edge, add a splash of lemon juice—just don’t overdo it, or the paneer can become too soft.
- Spices: I mix smoked paprika with garam masala for that deep, smoky warmth—your nose will love the rich aroma. Feel free to swap in chipotle powder if you crave extra heat and smokiness.
- Lemon Juice: Brightens the marinade and cuts through the richness. I love a good squeeze before baking—look for lemons that feel heavy and smell fresh, for maximum zing.
- Oil: I use neutral oil like canola or vegetable to help the marinade cling and to aid browning. If you prefer a richer flavor, a splash of mustard oil adds a pungent kick—just be mindful of the smoke point.
- Bell Peppers & Onions: Optional but lovely—adds sweetness and crunch. Slice thin, toss in a little oil, and roast alongside the paneer for a burst of color and flavor.
- Skewers: I opt for metal skewers for quick cleanup, but wooden ones work fine if soaked in water first. They help hold everything steady and give those crispy edges.
Spotlight on key ingredients
Paneer:
- I prefer firm, fresh paneer that holds its shape; look for one with a mild, milky aroma. If yours is crumbly, try pressing out excess moisture or choosing a slightly fresher block.
- Yogurt Marinade: I use thick Greek yogurt for a creamy coat and smoky flavor. If you want a tangier edge, add a splash of lemon juice—just don’t overdo it, or the paneer can become too soft.
- Spices: I mix smoked paprika with garam masala for that deep, smoky warmth—your nose will love the rich aroma. Feel free to swap in chipotle powder if you crave extra heat and smokiness.
Lemon Juice & Oil:
- Lemon Juice: Brightens the marinade and cuts through the richness. I love a good squeeze before baking—look for lemons that feel heavy and smell fresh, for maximum zing.
- Oil: I use neutral oil like canola or vegetable to help the marinade cling and to aid browning. If you prefer a richer flavor, a splash of mustard oil adds a pungent kick—just be mindful of the smoke point.
Notes for ingredient swaps
- Dairy-Free: Use coconut yogurt instead of Greek yogurt for a tropical twist, but expect a slightly sweeter and less tangy flavor.
- Vegan Paneer: Swap with firm tofu pressed and marinated similarly. Tofu won’t have the same melt-in-the-mouth feel, but it absorbs flavors well.
- Smoked Paprika: If unavailable, chipotle powder adds a smoky punch, though it’s spicier and more intense in flavor.
- Lemon Juice: Lime juice works as a bright, zesty alternative, offering a slightly different citrus aroma and tang.
- Oil Choices: Swap vegetable oil for ghee for a richer, nuttier flavor, but be mindful of the smoke point and adjust baking time slightly.
- Bell Peppers & Onions: Zucchini or cherry tomatoes can replace them, adding their own sweetness and moisture during roasting.
- Skewers: Use wooden skewers soaked in water for 30 minutes to prevent burning, or metal skewers for durability and easy cleanup.
Equipment & Tools
- Baking sheet: To hold the skewers during baking
- Parchment paper or silicone mat: For easy cleanup and non-stick surface
- Skewers (metal or soaked wooden): To hold paneer and veggies together for grilling
- Mixing bowls: To prepare the marinade and toss paneer
- Brush or spoon: To apply marinade evenly
- Tongs: To turn skewers during baking
Step-by-step guide to baked paneer tikka
- Preheat your oven to 200°C (390°F). Use a baking sheet lined with parchment or a silicone mat for easy cleanup.
- Prepare skewers: if using wooden skewers, soak them in water for 30 minutes to prevent burning. Metal skewers don’t need soaking.
- Cut paneer into 1-inch cubes. Pat dry with paper towels to remove excess moisture, which helps marinade absorption.
- Make the marinade: mix Greek yogurt, lemon juice, smoked paprika, garam masala, minced garlic, salt, and a drizzle of oil in a bowl until smooth.
- Marinate the paneer: toss the cubes in the marinade, ensuring each piece is well coated. Cover and refrigerate for at least 30 minutes, up to 2 hours.
- Thread the marinated paneer onto skewers, alternating with slices of bell peppers or onions if using. Leave some space for even cooking.
- Arrange skewers on the prepared baking sheet, leaving space between each for air circulation.
- Bake at 200°C (390°F) for 15-20 minutes. After 10 minutes, turn the skewers to promote even charring.
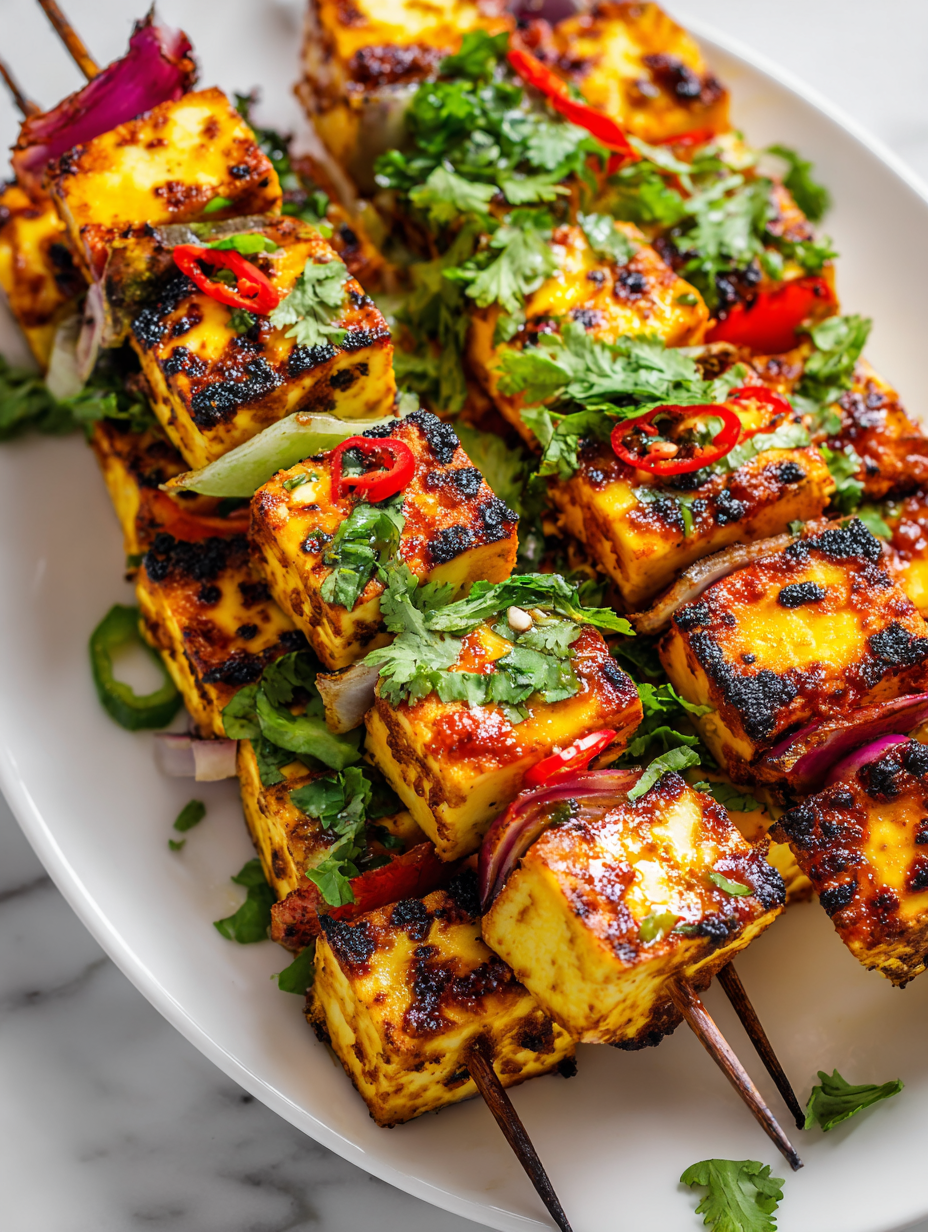
- Check for color: edges should be golden and slightly charred. The paneer should be firm but tender. If not, bake a few more minutes.
- Broil for an additional 2-3 minutes if you want more char and smoky flavor, watching carefully to prevent burning.
- Remove from oven and let rest for 3-5 minutes. This helps the juices settle and keeps the paneer moist.
- Serve hot, garnished with fresh cilantro or a squeeze of lemon if desired.
Let the baked paneer rest for 3-5 minutes on the tray. Serve hot, garnished with chopped cilantro or a squeeze of lemon. For extra smoky flavor, you can briefly broil again, watching closely to prevent burning.
How to Know It’s Done
- Edges are golden with slight charring, indicating proper roasting.
- Paneer feels firm but gives slightly when pressed, not mushy.
- Marinade has absorbed well, with no excess liquid on the surface.
Baked Paneer Tikka
Ingredients
Equipment
Method
- Preheat your oven to 200°C (390°F). Line a baking sheet with parchment paper or a silicone mat to prevent sticking.
- If using wooden skewers, soak them in water for at least 30 minutes to prevent burning during baking. Metal skewers can be used directly.
- Gently pat the paneer cubes dry with a paper towel to remove excess moisture, helping the marinade stick better.
- In a mixing bowl, combine Greek yogurt, lemon juice, smoked paprika, garam masala, minced garlic, salt, and oil. Whisk until smooth and fragrant.
- Toss the paneer cubes gently in the marinade until each piece is evenly coated. Cover and refrigerate for at least 30 minutes, or up to 2 hours, to deepen the smoky flavor.
- Thread the marinated paneer cubes onto skewers, alternating with slices of bell pepper and onion if using. Leave space between pieces for even baking.
- Arrange the skewers on the prepared baking sheet, ensuring they are not overcrowded for proper air circulation and browning.
- Bake in the preheated oven for 15-20 minutes. At the halfway point, use tongs to turn the skewers for even charring and smoky edges.
- Once the edges are golden and slightly charred, and the paneer feels firm but tender, remove from the oven. For extra smoky flavor, briefly broil for 2-3 minutes, watching carefully.
- Let the skewers rest for 3-5 minutes to allow juices to settle. Remove the paneer and vegetables from skewers and serve hot, garnished with fresh herbs or a squeeze of lemon if desired.
Notes
Pro tips for baked paneer tikka
- Boldly Brush: Apply marinade evenly with a silicone brush for consistent flavor and better adherence.
- Sizzle Check: When baking, listen for a gentle crackle indicating crisp edges and smoky aroma.
- Color Cues: Look for deep golden edges with slight charring—these signals mean perfect doneness.
- Smoky Boost: Broil for 2-3 minutes at the end to intensify the smoky flavor—stay nearby to prevent burning.
- Skewer Stability: Ensure paneer pieces are snug but not overcrowded on skewers for even cooking.
- Rest Briefly: Let the baked paneer sit for 3 minutes after coming out of the oven; it helps retain juices and flavor.
- Flip & Bake: Turn skewers halfway through baking for uniform browning and a consistent smoky crust.
Common mistakes and how to fix them
- FORGOT to preheat oven → always preheat for even cooking and browning.
- DUMPED marinade too quickly → let paneer marinate at least 30 minutes for flavor.
- OVER-TORCHED edges → reduce baking time or lower oven temperature to prevent burning.
- MISSED turning skewers → turn halfway to ensure even charring and prevent sticking.
Quick fixes and pantry swaps
- When in doubt, splash a little lemon on the paneer for extra brightness and to tame excess spice.
- If the marinade is too thick, open the fridge door and rescue with a splash of water or yogurt.
- Patch over burnt edges with a sprinkle of fresh herbs or a squeeze of lemon to refresh flavor.
- Shield from direct heat if edges brown too quickly—use foil or lower oven rack for gentle baking.
- When paneer is too crumbly, swap with slightly fresher or pressed tofu for a similar texture.
Prep, store, and reheat tips
- Marinate the paneer and vegetables up to 24 hours ahead in the fridge, which deepens flavors and makes assembly faster.
- Store marinated skewers covered in an airtight container; they stay good for about 24-48 hours, but best eaten fresh for optimal smoky aroma.
- Refrigerated baked paneer tikka keeps well for 2-3 days; reheating in the oven or a hot skillet restores some of the original char and tenderness, with a slight smoky smell returning.
- For reheating, warm at 180°C (350°F) for 5-8 minutes until heated through and edges are slightly crispy, watching for over-drying or burning.
- The flavors may mellow over time, so a quick splash of lemon or fresh herbs before serving can refresh the dish and brighten the overall taste.
Top questions about baked paneer tikka
1. Can I use softer paneer?
Use firm, fresh paneer for the best texture. It should feel dense and have a mild aroma. Softer paneer may crumble during baking.
2. How long should I marinate the paneer?
Marinate the paneer for at least 30 minutes, but up to 2 hours enhances flavor and absorption. Longer marination deepens the smoky taste.
3. How do I know it’s cooked properly?
Bake at 200°C (390°F) for 15-20 minutes. Look for golden edges and slight charring. Turning halfway ensures even browning.
4. My paneer is burning on the edges, what do I do?
If edges burn, lower the oven temperature or shorten baking time. For extra char, broil for 2-3 minutes but watch closely.
5. Can I use wooden skewers?
Use metal skewers or soak wooden skewers in water for 30 minutes. This prevents burning and helps hold the paneer steady.
6. How should I reheat leftovers?
Reheat baked paneer in a 180°C (350°F) oven for 5-8 minutes until warm and edges crisp up. A quick broil can restore smoky flavor.
7. Can I make it dairy-free?
Switch Greek yogurt for coconut yogurt or silken tofu for dairy-free options. They absorb marinade well but may alter texture slightly.
8. How can I customize the flavor?
Add a squeeze of lemon before baking for brightness or sprinkle fresh herbs after. Adjust spices to taste for a personalized touch.
9. Any tips for marinating properly?
Ensure the marinade is evenly coated and not too thick. Using a brush helps distribute flavors uniformly over the paneer.
10. How do I add more smoke flavor?
Use smoked paprika or chipotle powder for a deeper smoky flavor. Adjust spice levels to suit your heat preference.
This baked paneer tikka isn’t just a shortcut; it’s a way to keep that smoky, creamy charm accessible without a grill. Every time I make it, I’m reminded how a simple change—baking instead of grilling—can bring out such a rich, comforting flavor.
It’s perfect for those nights when outdoor cooking feels like a hassle or when you want a reliable, satisfying snack that’s fast to assemble. Sometimes, the best ideas come from a moment of kitchen chaos, and this dish is proof that a little improvisation goes a long way.

