
Switching from deep-frying to baking spring rolls was a revelation in my kitchen. The smell of crispy edges baking in the oven, with a hint of sesame and fresh vegetables, feels somehow more wholesome and inviting. It’s a little less chaotic than frying, but no less satisfying when you pull that perfectly golden roll from the oven.
Baking these spring rolls is about more than just a healthier twist; it’s about rediscovering how simple ingredients can come together into something crispy, gooey, and truly comforting. I love how the oven does most of the work, giving me space to focus on filling and rolling without the splatter and smell of hot oil.
This method is perfect for when you want that crispy crunch without the greasy aftermath. Plus, it’s a good way to make spring rolls more accessible for weeknight dinners or quick snacks. Every time I bake a batch, I feel a little more confident in turning a traditionally fried dish into something lighter but still packed with flavor.
Focusing on baking spring rolls instead of frying them, I discovered a less greasy, crispier version that still holds all the satisfying textures and flavors. It’s an honest shift from greasy indulgence to a lighter, more accessible snack that feels just as indulgent.
The inspiration behind this twist
- This recipe came together after a lazy Sunday of rummaging through the fridge and thinking about how to get that crispy, comforting crunch without the mess of oil splatter. I remembered how my grandma baked spring rolls in her oven, and I thought, why not try that myself? The first batch was a happy accident—crispy, golden, and way less greasy.
- Baking these turned into a kind of quiet victory for me—less fuss, less oil, but still that satisfying crunch I crave. I love how it makes me rethink what a ‘treat’ can be, especially on busy weeknights when I want comfort without the cleanup. It’s funny how something so simple can turn into a little ritual, a way to enjoy familiar flavors with a lighter touch.
- story_type
- heading
Key ingredients at a glance
- Rice paper wrappers: I love the delicate, translucent look before baking—just a quick soak makes them pliable; skip soggy and they’ll crisp up nicely.
- Vegetable filling: I prefer a mix of shredded carrots, cabbage, and a hint of scallions—crisp, fresh, with a slight sweetness that balances the savory notes.
- Protein option: Ground chicken or tofu works great—ensure it’s cooked through and finely chopped to avoid soggy rolls, but don’t overcook the tofu to keep it tender.
- Sweet chili sauce: A little dab inside adds a sweet-spicy kick; look for one with a bright, tangy flavor that complements the filling.
- Sesame oil: Just a splash in the filling gives a toasty aroma; use sparingly if you want a more neutral flavor or skip for a milder taste.
- Egg wash: Brushing the edges with beaten egg seals the rolls perfectly; it’s the little magic that helps them hold together during baking.
- Cooking spray or oil: A quick spritz or a light brushing helps achieve that golden, crispy surface—don’t overdo it, or they’ll be greasy.
Spotlight on key ingredients
Rice paper wrappers:
- They’re delicate and translucent before baking—soaking makes them pliable but avoid over-soaking or they’ll tear. When baked, they crisp up beautifully, with a light, crackly texture.
- Vegetable filling: I love shredded carrots and cabbage for their crispness and natural sweetness. When cooked, they stay firm and juicy, giving each bite a fresh, vibrant crunch that balances the savory filling.
Vegetable filling:
- Filling mix: A combination of shredded carrots, cabbage, and scallions creates a colorful, fragrant filling. When baked, it releases a sweet and smoky aroma, with the vegetables maintaining a satisfying crunch and bright flavor even after roasting.
- Sesame oil: Just a splash in the filling adds a toasted, nutty aroma. It’s subtle but makes a noticeable difference—think warm, fragrant, and a little smoky—enhancing every bite.
Notes for ingredient swaps
- Dairy-Free: Omit egg wash or replace with cornstarch slurry for sealing—less shine, slightly less crisp.
- Gluten-Free: Use rice paper exclusively; skip soy sauce or opt for gluten-free tamari for filling seasoning.
- Vegetarian: Swap chicken with extra tofu or tempeh—maintains protein but shifts texture and flavor.
- Vegan: Omit eggs entirely; try a thin layer of rice flour paste to seal edges—won’t be as shiny but still effective.
- Nut-Free: Ensure filling contains no crushed peanuts or nuts; omit sesame oil if allergies are a concern for a milder aroma.
- Low-Sodium: Use reduced soy sauce and skip added salt—still flavorful, just a bit more subtle in taste.
- Extra Crunch: Brush with oil generously before baking; adds more golden color and crunch, but watch for greasiness.
Equipment & Tools
- Baking sheet: To hold the rolls while baking evenly.
- Parchment paper: Prevent sticking and facilitate easy cleanup.
- Small bowl: For soaking rice paper wrappers.
- Pastry brush: To seal edges with egg wash.
Step-by-step guide to baked spring rolls
- Gather your equipment: a baking sheet, parchment paper, a small bowl for egg wash, and a brush. Preheat your oven to 200°C (390°F).
- Prep the filling: mix shredded carrots, cabbage, scallions, and cooked protein (chicken or tofu). Season with soy sauce, a splash of sesame oil, and a pinch of salt. Set aside.
- Soften rice paper wrappers: dip each sheet in warm water for about 10 seconds until pliable but not soggy. Lay flat on a clean surface.
- Fill the rolls: place a small spoonful of filling near one corner of the wrapper. Fold the corner over, then fold in the sides, and roll tightly towards the opposite corner. Brush edges with beaten egg to seal.
- Arrange the rolls: place seam-side down on a parchment-lined baking sheet. Spray lightly with cooking spray or brush with a little oil to promote crisping.
- Bake the spring rolls: slide into the oven. Bake for 15–20 minutes, turning once halfway through. Look for golden, crispy edges and a fragrant aroma.
- Check for doneness: the rolls should be evenly golden and firm to the touch. If they look pale, bake a few more minutes. If edges brown too quickly, lower oven temp slightly.
- Rest the baked rolls: let sit for 2 minutes on a wire rack. This helps them crisp up further. Serve hot with dipping sauce.
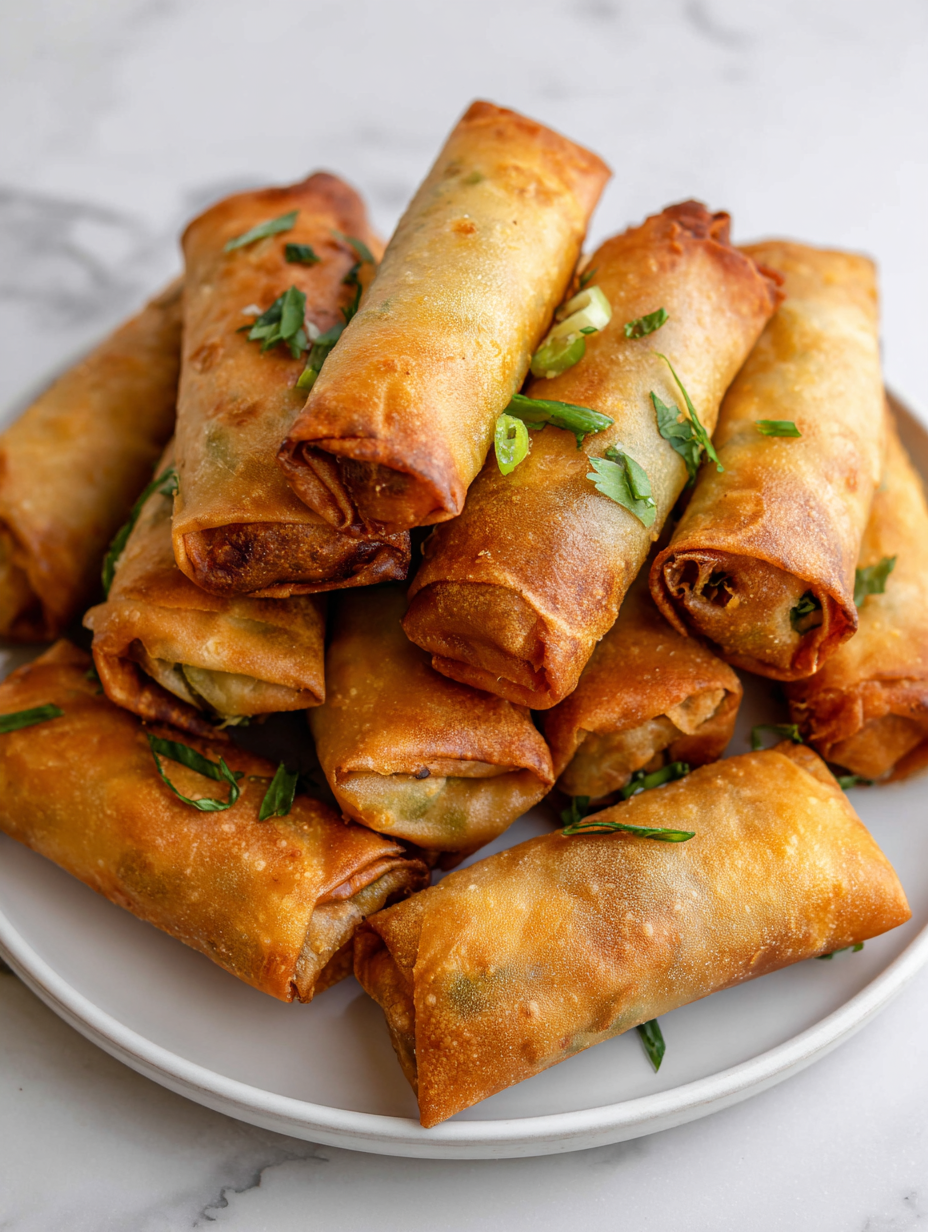
Let the baked rolls rest for a couple of minutes on a wire rack before serving. Plate with a side of sweet chili or soy sauce for dipping. Enjoy while still warm and crisp.
How to Know It’s Done
- Golden, crispy exterior with even browning.
- Internal filling hot and cooked through, no raw vegetables.
- Sealed edges stay intact when gently pressed.
Baked Spring Rolls
Ingredients
Equipment
Method
- Preheat your oven to 200°C (390°F) and line a baking sheet with parchment paper. Gather a small bowl of warm water for soaking rice paper.
- Mix shredded carrots, cabbage, sliced scallions, cooked chicken or tofu, soy sauce, and sesame oil in a bowl until well combined. This filling will be vibrant and fragrant.
- Dip one rice paper sheet into the warm water for about 10 seconds, just until it becomes pliable but not soggy. Carefully lay it flat on a clean surface.
- Spoon a small amount of filling near the corner of the soaked rice paper. Fold the corner over the filling, then fold in the sides, and roll tightly towards the opposite corner. Brush the edge with beaten egg to seal.
- Place the sealed spring roll seam-side down on the prepared baking sheet. Repeat the process with remaining rice paper and filling.
- Lightly spray or brush the tops of the rolls with oil to promote even crisping and golden color.
- Bake the spring rolls in the oven for 15–20 minutes, turning once halfway through, until they are golden brown and crispy.
- Gently remove the baked rolls from the oven and let them rest for 2 minutes on a wire rack. This helps them crisp up further.
- Serve the spring rolls hot with your favorite dipping sauce, like sweet chili or soy sauce, for a perfect crunchy bite.
Pro tips for perfect baked spring rolls
- Use a light spray of oil on the rolls before baking to promote even crisping and a golden color.
- Soak rice paper just until pliable—over-soaking causes tears, under-soaking makes wrapping difficult.
- Seal edges well with beaten egg or a slurry to prevent filling from escaping during baking.
- Bake at 200°C (390°F) and turn rolls halfway for uniform browning and crunch.
- Rest the baked rolls for 2 minutes on a wire rack—this enhances crispness and prevents sogginess.
- Keep an eye on color—if edges darken too quickly, lower the oven temperature slightly.
- For extra crunch, give the rolls a quick spray of oil before the final few minutes of baking.
Common mistakes and how to fix them
- FORGOT to seal edges properly → Use egg wash to secure tightly.
- DUMPED filling too wet → Drain excess moisture before filling.
- OVER-TORCHED rolls → Reduce oven temp or bake for less time.
- MISSED resting time → Let baked rolls cool slightly for crunch.
Quick fixes for baked spring rolls
- When rolls crackle without browning, spray lightly with oil and bake 2 minutes longer.
- If filling leaks, seal edges thoroughly with beaten egg or a slurry before baking.
- Dumped filling too wet? Drain excess moisture or add a touch more filling ingredients.
- Over-torched rolls? Lower oven temperature slightly or reduce baking time to avoid burnt edges.
- Splash a quick vinegar or citrus juice if filling tastes too bland or flat after baking.
Prep, store, and reheat tips
- Prepare the filling and soak rice paper wrappers ahead of time; store in an airtight container in the fridge for up to 24 hours. The flavors meld nicely overnight.
- Assemble the rolls a few hours before baking, then cover tightly with plastic wrap. Keep in the fridge for up to 12 hours without losing crispness.
- Bake the spring rolls fresh for optimal crunch, but they can be baked and stored in a loosely covered container in the fridge for up to 2 days. Expect a slight softening, but a quick reheat restores crunch.
- Reheat in a 180°C (355°F) oven for about 5-7 minutes until heated through and the surface shimmers with a slight crunch. The aroma of toasted sesame and baked dough will fill the air.
Top questions about baked spring rolls
1. How do I prevent rice paper from tearing?
Use rice paper wrappers soaked just until pliable; over-soaking can make them tear, under-soaking makes wrapping tricky.
2. What’s the ideal baking time and temperature?
Bake at 200°C (390°F) for 15-20 minutes until golden and crispy. Turn halfway for even color.
3. How do I keep the filling from making the rolls soggy?
Ensure the filling isn’t too wet; drain excess moisture or reduce liquid ingredients to keep rolls crisp.
4. How do I make sure the rolls stay sealed?
Seal edges with beaten egg or a slurry to prevent filling from leaking out during baking.
5. Should I let the baked rolls cool before eating?
Rest the baked rolls for 2 minutes on a wire rack to improve crunch before serving.
6. Can I make these less greasy?
Spray lightly with oil before baking to promote even browning and a crispy surface.
7. How can I get more crispiness?
Use a quick spray of oil and increase oven temperature slightly for extra crunch and golden color.
8. How do I reheat baked spring rolls?
Reheat in a 180°C (355°F) oven for about 5-7 minutes until hot and crispy again.
9. Can I make these in advance?
You can prepare the filling and soak rice paper ahead, then assemble and bake fresh or within a day.
10. What if my rolls aren’t crispy enough?
If rolls crackle without browning, spray with oil and bake a few more minutes; adjust oven temp if needed.
Baked spring rolls are a reminder that simplicity can still surprise. The warm aroma of toasted sesame and crispy edges makes every bite feel like a small celebration of honest home cooking.
They’re perfect for when you want a snack that’s satisfying but not weighed down, especially during busy weeks or when friends drop by unexpectedly. Plus, knowing you baked them instead of fried adds a little extra pride to the process.

