Baked mozzarella sticks might sound simple, but mastering that perfect crunch combined with gooey cheese inside takes a bit of finesse. I used to think frying was the only way to get that satisfying crispy shell, but I’ve found baking gives me control and less mess, without sacrificing flavor. Plus, I can sneak in a few healthier tweaks without feeling guilty.
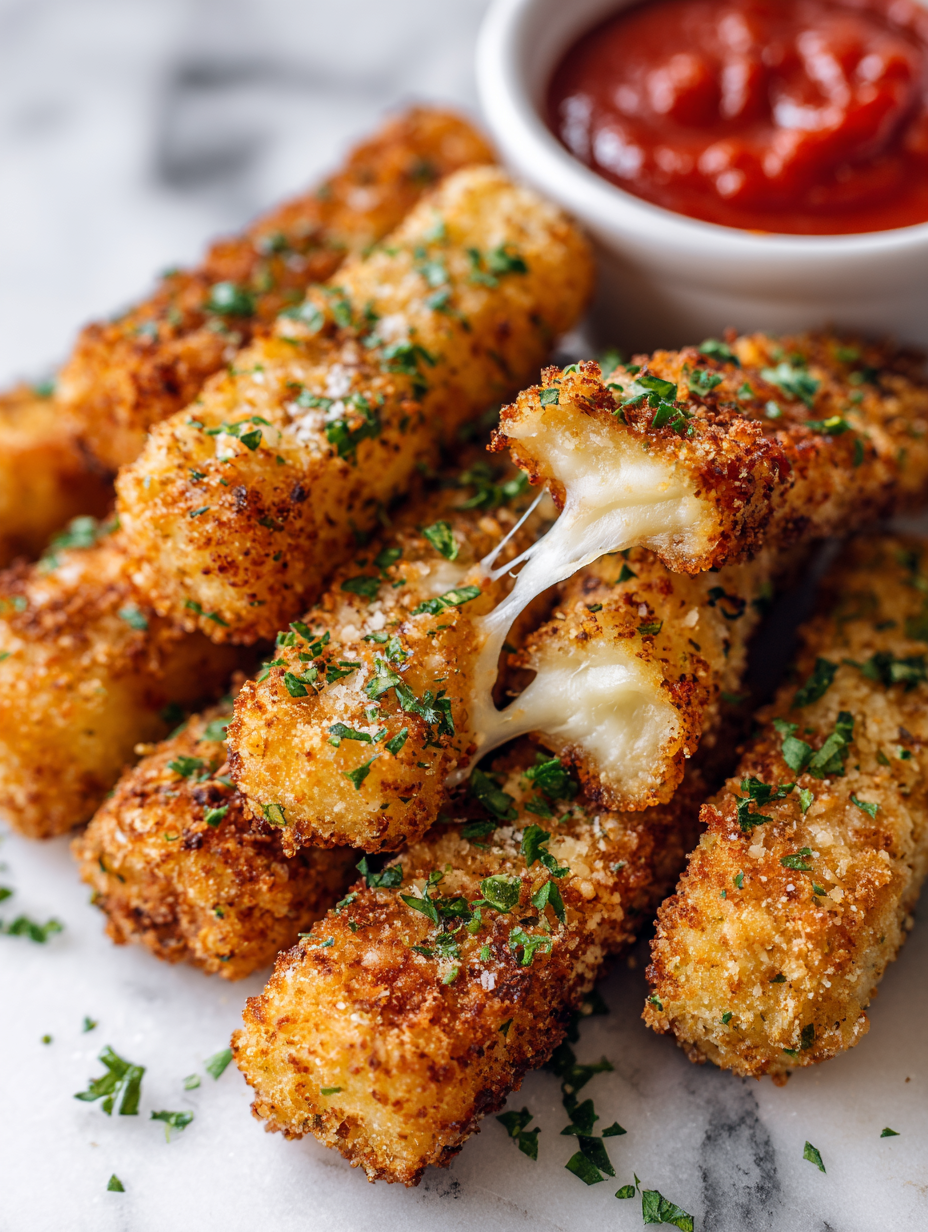
There’s something oddly satisfying about pulling these out of the oven and hearing that gentle crackle. The cheese oozes just right—hot, melty, and a little stringy—while the breadcrumb coating stays crisp and golden. It’s a snack that feels indulgent but is surprisingly straightforward to make on a weeknight or for a casual get-together.
Focusing on the surprising crunch and gooey interior that makes baked mozzarella sticks feel just as indulgent as fried ones, but with less mess and more control.
The story behind this recipe
- This recipe came about after a late-night craving for that crispy, cheesy snack I’d always order but rarely make at home. I wanted something that felt just as satisfying but didn’t require deep-frying and the usual greasy cleanup. Baked mozzarella sticks seemed like a challenge—how to get that perfect crunch without the oil splatter, yet still keep the cheese melty and inviting.
- One evening, I started experimenting with different coatings and baking temps, aiming for that elusive balance of crisp exterior and gooey interior. After a few tries, I found that a simple seasoned breadcrumb crust baked at just the right heat gave me the crunch I was craving, with none of the mess. Now, these sticks are a go-to when I want comfort food that feels a little smarter.
- heading
- story_type
Key ingredients and tips
- Mozzarella: I prefer fresh mozzarella for that creamy, stretchy melt—look for blocks, not pre-shredded, for better texture. Your cheese should be firm but yielding, with a mild, milky aroma.
- Breadcrumbs: I use panko for extra crunch and lightness, seasoned with a pinch of garlic powder and paprika. If you want more flavor, toss in some Italian herbs or a dash of cayenne for heat.
- Eggs: Whisked eggs help the coating stick and create a barrier that crisps up nicely. For a richer crust, add a splash of milk or water—just not too much, or it gets runny.
- Flour: A light dusting of all-purpose flour helps the egg adhere to the cheese. For gluten-free, almond flour works but skews the texture slightly towards tender rather than crispy.
- Seasonings: Salt, pepper, and a touch of smoked paprika really boost flavor. I sometimes add a pinch of onion powder—don’t skip this, it adds a subtle savory note that’s addictive.
- Cooking spray: I use a light spray of oil to help the crust crisp up in the oven, but a quick brush of melted butter can give an extra golden sheen and richer flavor. Watch for over-browning.
Spotlight on key ingredients
Mozzarella:
- I prefer fresh mozzarella for that creamy, stretchy melt—look for blocks, not pre-shredded, for better texture. Your cheese should be firm but yielding, with a mild, milky aroma.
- Cheese: It behaves differently when cold—keeps its shape during coating, and melts perfectly when baked, creating that gooey interior.
Breadcrumbs:
- I use panko for extra crunch and lightness, seasoned with garlic powder and paprika. They crisp up beautifully in the oven, giving that satisfying exterior.
- Their texture is crucial—too fine, and they don’t crunch; too coarse, and they might fall off. Season well for flavor inside the crispy shell.
Notes for ingredient swaps
- Dairy-Free: Use coconut or cashew cheese instead of mozzarella. It melts differently, so expect a slightly different gooeyness.
- Gluten-Free: Almond or rice flour can replace all-purpose flour. Panko can be swapped for gluten-free bread crumbs, but the texture might be less airy.
- Vegan: Plant-based cheese melts less than dairy, but works if heated gently. Use a flaxseed or chia egg for binding instead of chicken egg.
- Low-Sodium: Choose unsalted breadcrumbs and cheese, then add your own seasoning to control salt levels.
- Smoked Flavor: Add a pinch of smoked paprika or chipotle powder to your breadcrumb mixture for a smoky kick. It’s a subtle enhancement that deepens flavor.
- Herb Variations: Incorporate chopped fresh herbs like basil, oregano, or parsley into the breading for a burst of freshness. Skip or reduce dried herbs if you prefer a milder taste.
Equipment & Tools
- Baking sheet: Provides a flat surface for baking the sticks evenly.
- Parchment paper: Prevents sticking and makes cleanup easier.
- Small bowls: Hold flour, eggs, and breadcrumbs for coating.
- Tongs: Handle the coated sticks without breaking the coating.
- Wire rack: Allows excess moisture to escape, keeping the coating crisp.
Step-by-step guide to baked mozzarella sticks
- Equipment & Tools: Gather a baking sheet lined with parchment, a small bowl for flour, one for beaten eggs, and a shallow dish for seasoned breadcrumbs. Have tongs and a wire rack ready for cooling.
- Cut mozzarella: Slice a block of mozzarella into 1/2-inch sticks. Keep them cold—cold cheese is less likely to ooze during coating.
- Prepare coating stations: Place flour in one dish, beaten eggs in another, and seasoned panko breadcrumbs in a third. Add a pinch of salt, pepper, garlic powder, and paprika to breadcrumbs.
- Coat the cheese: Roll each mozzarella stick first in flour, tapping off excess. Dip into egg, then coat thoroughly with breadcrumbs, pressing gently to adhere. Chill coated sticks for 10 minutes to set the crust.
- Preheat oven: Set to 220°C (425°F). Line your baking sheet with parchment for easy cleanup.
- Bake: Arrange mozzarella sticks on the prepared sheet, leaving space between. Spray lightly with cooking spray or brush with melted butter. Bake for 10-12 minutes, until golden and crisp.
- Check for doneness: The coating should be golden, cheese slightly jiggly but not oozing excessively, and the crust crisp.
- Finish & serve: Let rest for 2 minutes. Serve warm with marinara or your favorite dipping sauce.
Let the mozzarella sticks rest for a couple of minutes after baking. Serve immediately for maximum gooeyness and crunch, garnished with fresh herbs if desired. Plate on a warm dish, with a side of marinara or spicy dip.
How to Know It’s Done
- Golden, crispy exterior with even color.
- Cheese inside is soft, not melted into a puddle.
- Crust feels firm and crackles slightly when bitten.
Baked Mozzarella Sticks
Ingredients
Equipment
Method
- Slice the mozzarella block into 1/2-inch thick sticks, keeping the cheese cold so it holds its shape during coating.
- Set up three shallow dishes: one with flour, one with beaten eggs, and one with seasoned panko breadcrumbs mixed with garlic powder and paprika.
- Roll each mozzarella stick in the flour, pressing lightly to coat, then dip into the egg, allowing excess to drip off.
- Next, coat the stick thoroughly with seasoned breadcrumbs, pressing gently to ensure they stick well. Place coated sticks on a tray and chill for 10 minutes to set the crust.
- Preheat your oven to 220°C (425°F). Line a baking sheet with parchment paper and lightly spray with cooking spray.
- Arrange the chilled mozzarella sticks on the prepared baking sheet, spacing them evenly. Lightly spray or brush them with a bit of oil or melted butter for extra crispness.
- Bake the sticks in the oven for 10-12 minutes, until the coating is golden brown and crispy. Keep an eye on them so they don’t over-brown.
- Once baked, remove the mozzarella sticks from the oven and let them rest for 2 minutes to allow the cheese to settle slightly.
- Serve immediately with your favorite dipping sauce, like marinara or spicy aioli, while the cheese inside is still hot and gooey.
Notes
Pro tips for perfect baked sticks
- Bolded mini-head: Use cold mozzarella to prevent excessive ooze during coating; keep the cheese refrigerated until ready.
- Bolded mini-head: For extra crispness, refrigerate coated sticks for at least 10 minutes before baking—helps set the crust.
- Bolded mini-head: Lightly spray or brush with oil before baking; it enhances browning and adds a subtle crunch.
- Bolded mini-head: Keep an eye on the oven; breadcrumbs can over-brown quickly, so remove when golden but not burnt.
- Bolded mini-head: When coating, press breadcrumbs gently into the cheese to ensure they stick and don’t fall off during baking.
- Bolded mini-head: Test for doneness by gently pressing the cheese; it should jiggle slightly but not leak cheese excessively.
- Bolded mini-head: Serve immediately after baking for maximum gooey cheese and crispy exterior—resists sogginess.
Common mistakes and how to fix them
- FORGOT to preheat oven → Always preheat for even cooking and crispness.
- DUMPED cheese too early → Wait until cheese is just melted for perfect gooeyness.
- OVER-TORCHED breadcrumbs → Keep an eye on the color; remove when golden, not burnt.
- MISSED chilling coated sticks → Chill for 10 minutes to set the crust and prevent cheese leakage.
Quick fixes and pantry swaps
- When cheese oozes too much, freeze sticks for 10 minutes before baking.
- Splash a little lemon juice into your breadcrumb mixture for a bright crunch.
- Patch soggy spots with extra breadcrumbs and bake a few minutes longer.
- Shield delicate cheese with a thin layer of foil if edges brown too quickly.
- If breadcrumbs burn, switch to panko or reduce oven temperature slightly.
Prep, store, and reheat tips
- You can prepare the coated mozzarella sticks up to 2 hours ahead; keep them uncovered in the fridge to prevent moisture buildup, which can make the crust soggy.
- Store baked mozzarella sticks in an airtight container in the fridge for up to 2 days. Reheat in the oven at 180°C (350°F) for about 10 minutes until crispy and hot.
- For longer storage, freeze unbaked sticks on a tray, then transfer to a bag. Bake directly from frozen, adding extra 2-3 minutes to baking time.
- Reheating in the oven helps restore crispness better than microwave. Expect the cheese to be melty and slightly gooey, with a warm, inviting aroma.
- Freshly baked sticks are best eaten immediately, but they can be enjoyed later with reheating, keeping that satisfying crunch and melty cheese intact.
Top questions about baked mozzarella sticks
1. How do I prevent cheese from oozing too much during baking?
Use cold mozzarella to prevent excessive melting during coating. Keep it refrigerated until ready to assemble.
2. What’s the ideal oven temperature and time for baking these sticks?
Bake at 220°C (425°F) for about 10-12 minutes until golden and crispy. Check the color and texture regularly.
3. Can I prepare these in advance and freeze them?
Yes, you can freeze unbaked coated sticks for up to 2 months. Bake directly from frozen, adding a couple of extra minutes.
4. How do I reheat leftovers without losing crunch?
Reheat in a 180°C (350°F) oven for about 10 minutes until hot and crispy. Avoid microwaving, which can make the coating soggy.
5. What type of breadcrumbs works best for crispiness?
Use panko breadcrumbs for the best crunch. Season them with garlic and paprika for extra flavor.
6. Should I chill the coated sticks before baking?
Ensure the coated sticks are chilled for at least 10 minutes before baking. This helps set the crust and prevents cheese leakage.
7. How can I get a more golden, crispy crust?
Spray lightly with cooking oil or brush with melted butter before baking. It promotes browning and crunch.
8. How do I avoid over-browning or burning the coating?
Watch the oven closely. Breadcrumbs can brown quickly; remove when golden to prevent burning.
9. Why should I place the sticks on a wire rack after baking?
Use a wire rack to cool baked sticks. It helps excess moisture escape, keeping the coating crisp.
10. Can I add extra flavors to the coating?
For a smoky flavor, add a pinch of smoked paprika to the breadcrumbs or seasonings.
These baked mozzarella sticks are a reminder that comfort food can also be straightforward and less messy. The contrast of crispy exterior and gooey cheese inside makes them a perfect snack for any casual gathering or a quick treat on a busy night.
They’re easy to customize with herbs or spices, and the baking method keeps the kitchen cleaner while still delivering that satisfying crunch and melt. Sometimes, simple wins, especially when it’s this cheesy and crispy.

