Growing up, snacks like these cauliflower bites were a staple at every backyard barbecue and school lunch. There’s a nostalgic comfort in biting into that crispy coating, the tender cauliflower inside, and feeling a rush of childhood joy. Making them at home now, I love how I can tweak the recipe to keep that familiar warmth while making it a little healthier.
This recipe is also a bit of a rescue mission for cauliflower—an often underappreciated vegetable that shines here when coated in a crispy, golden shell. It’s a simple way to bring a crowd-pleasing snack to your table, especially when you’re craving something familiar yet fresh. Plus, it’s perfect for sharing, whether for game night or just a cozy evening in.
Focusing on the nostalgic comfort of childhood snacks, this recipe transforms simple cauliflower into crispy bites that evoke memories of school lunches and backyard parties, but with a modern, health-conscious twist.
The story behind this recipe
- This recipe came together on a rainy afternoon, when I was craving something crispy and satisfying but wanted to avoid deep frying. I remembered how much I loved those childhood snacks—crispy, cheesy, a little messy—and thought, why not give cauliflower a shot? It’s funny how a simple vegetable can transport you back to carefree days with just a few tweaks.
- I started experimenting with different coatings, trying to mimic that nostalgic crunch without all the oil. The result was a batch of golden, crispy bites that felt like a little piece of my childhood in every bite. Sharing them with friends, I realized how surprisingly versatile they are—great as an appetizer, snack, or even a side dish. That’s what keeps me coming back to this recipe, the memory it stirs up and how easy it is to make it your own.
- heading: The story behind this recipe
Ingredient breakdown: key components
- Cauliflower: I prefer a smaller, fresh head for more tender bites, but a larger one works if you cut into smaller florets. The smell when roasting is nutty and sweet, which hints at caramelization. Swap with broccoli if you want a different crunch and flavor profile.
- Eggs: They help the coating stick and create a light, crispy shell. If you’re vegan, try a flaxseed or aquafaba substitute—just expect a slightly different texture that’s still tasty. Whisk until frothy, it should look slightly glossy.
- Breadcrumbs: I opt for panko for that extra crunch, but seasoned breadcrumbs add flavor without extra effort. For gluten-free, coconut or almond flour can work but will change the crispiness and taste—less traditional, more unique.
- Parmesan (optional): Adds a cheesy, salty kick that complements the cauliflower’s earthiness. If dairy-free, nutritional yeast offers a similar umami punch with a nutty aroma. Grate finely so it melts into the coating nicely.
- Spices: Paprika, garlic powder, and a pinch of cayenne give the bites warmth and depth. Feel free to tweak these—smoky paprika for richness, cumin for earthiness. Toast spices briefly before mixing for a more intense flavor.
- Oil: Use a neutral oil like vegetable or avocado for roasting, which helps the coating crisp up. For a slightly healthier option, a light spray of olive oil works, but expect a softer crunch. Brush lightly before baking for even coverage.
- Lemon or vinegar: A squeeze or splash brightens the overall flavor, cutting through the richness. A little lemon zest in the coating can add a fresh zing, especially if serving with dips or sauces.
Spotlight on key ingredients
Cauliflower:
- I prefer a smaller, fresh head for more tender bites, but a larger one works if you cut into smaller florets. The smell when roasting is nutty and sweet, which hints at caramelization. Swap with broccoli if you want a different crunch and flavor profile.
- Eggs: They help the coating stick and create a light, crispy shell. If you’re vegan, try a flaxseed or aquafaba substitute—just expect a slightly different texture that’s still tasty. Whisk until frothy, it should look slightly glossy.
- Breadcrumbs: I opt for panko for that extra crunch, but seasoned breadcrumbs add flavor without extra effort. For gluten-free, coconut or almond flour can work but will change the crispiness and taste—less traditional, more unique.
Breadcrumbs:
- Cauliflower: It develops a beautifully caramelized, golden exterior when roasted, with a tender inside that offers a subtle nutty aroma. Watch for slight charring on edges, which adds depth, but avoid burning. Break into smaller florets for even crisping.
- Eggs: Frothy and slightly glossy after beating, eggs help the coating adhere and puff slightly in the oven. They also give a delicate crispness. Ensure the eggs are fresh and whisked thoroughly for even coating.
- Panko breadcrumbs create an airy, crunchy crust that shatters beautifully when bitten into. For a nuttier flavor, toasted breadcrumb options work well. Use seasoned breadcrumbs for extra flavor, or plain if adding spices separately.
Notes for ingredient swaps
- Vegetables: Broccoli florets can replace cauliflower for a slightly firmer bite with a more earthy flavor, and they roast quickly with a bright green hue. Carrots sliced thinly make a sweet, crunchy alternative, adding a pop of color and natural sweetness.
- Eggs: Flaxseed or chia seed mixed with water (1 tablespoon seeds + 3 tablespoons water, let sit 5 mins) can stand in for eggs. Expect a denser crust, but still crispy and binding well. Aquafaba (chickpea brine) is also a good vegan glue.
- Breadcrumbs: Panko puffs up more for extra crunch, but if you only have regular breadcrumbs, just toast them slightly to boost flavor. Coconut or almond flour works for gluten-free, but will give a nuttier taste and a softer texture.
- Cheese: Nutritional yeast offers a cheesy flavor without dairy, and it’s less greasy. Vegan Parmesan-style cheese can also be used, but it may melt less and have a different salty punch. For a sharper note, a sprinkle of crumbled feta or blue cheese can be added after baking.
- Spices: Smoked paprika adds a smoky depth, but cumin or turmeric lend warmth and color. For heat, cayenne is classic, but chipotle powder delivers a more complex smoky spice. Toast spices briefly before mixing for a richer aroma.
- Oil: Light spray of avocado oil gives a crisp finish, but olive oil or even melted coconut oil works. For a lower-fat option, brush lightly with water or skip oil altogether—your bites will be less crispy but still tasty.
- Acid: Lemon juice brightens the coating with a fresh zing, especially when squeezed over just before serving. A splash of apple cider vinegar can add a tangy punch if you want more acidity.
Equipment & Tools
- Baking sheet: To hold the cauliflower bites while baking evenly.
- Parchment paper or silicone mat: To prevent sticking and make cleanup easier.
- Mixing bowls: To prepare the egg wash and breadcrumb coating.
- Whisk: To beat eggs and incorporate spices.
- Spatula or tongs: To dip and coat the cauliflower florets efficiently.
- Spray bottle or brush: To lightly oil the coated cauliflower for crisping.
Step-by-step guide to baked cauliflower bites
- Preheat your oven to 200°C (390°F). Line a baking sheet with parchment paper, or lightly grease it. Have all your ingredients ready—cauliflower florets, eggs, breadcrumbs, spices, oil, and any optional cheese.
- Cut a small head of cauliflower into bite-sized florets, about 2-3 cm (1 inch). Rinse and pat dry thoroughly—moisture is the enemy of crispiness.
- In a bowl, beat 2 eggs until frothy. Add spices—paprika, garlic powder, cayenne—and a pinch of salt. Whisk well to combine.
- In a separate shallow dish, mix 1 cup panko breadcrumbs with 1/4 cup grated Parmesan (if using). For a vegan version, skip the cheese and add extra spices or nutritional yeast.
- Dip each cauliflower floret into the egg mixture, coating completely. Let excess drip off, then roll in the breadcrumb mixture until well coated. Place on the prepared baking sheet, spacing evenly.
- Lightly spray or brush the coated florets with oil. This will help them become golden and crispy in the oven.
- Bake for 20-25 minutes. Halfway through, turn the florets and spray lightly again to enhance crispness. Look for a golden-brown color and a crackling sound when you shake the sheet gently.
- Remove from oven when crispy and browned around the edges. Let rest for 5 minutes on the baking sheet. The bites will firm up slightly as they cool.
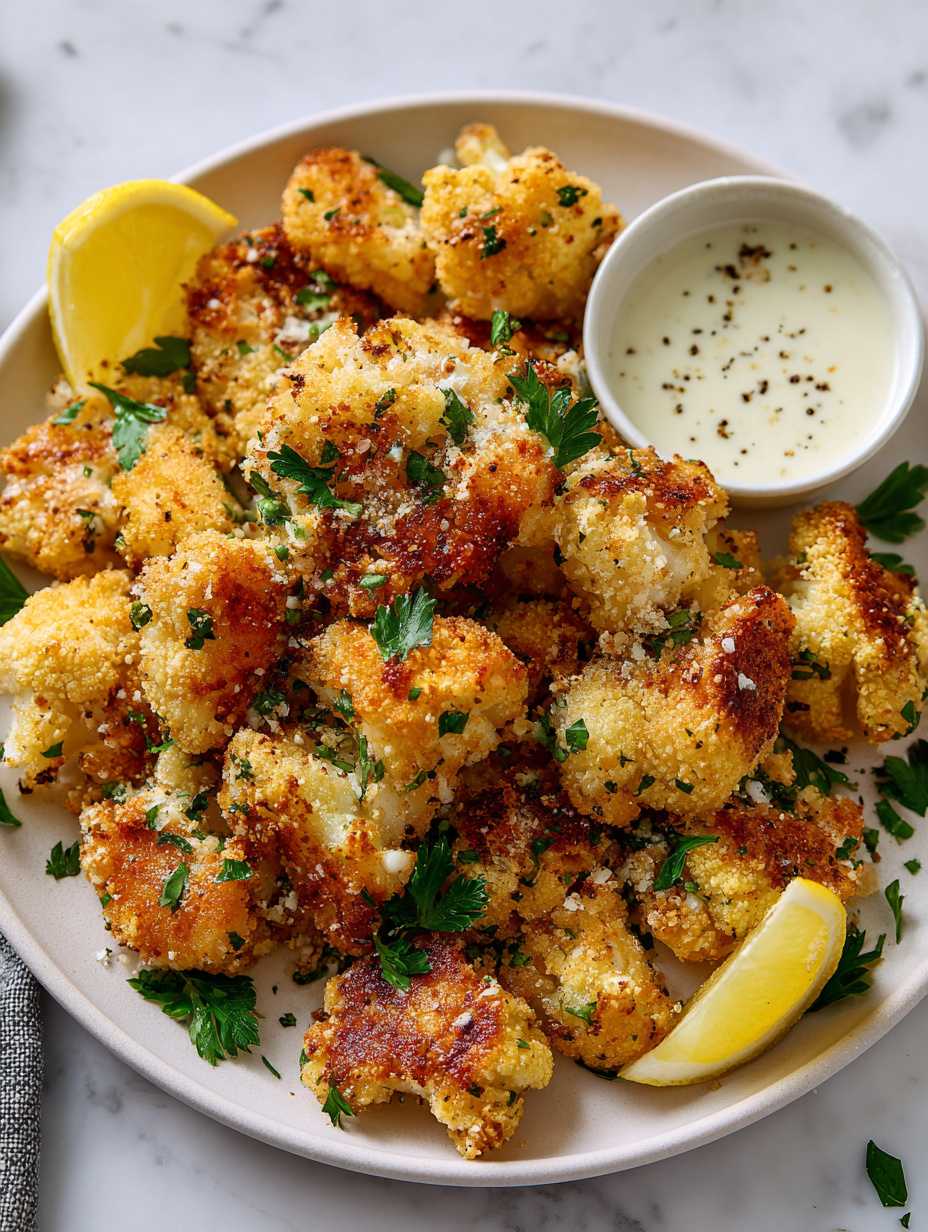
- Serve immediately with your favorite dips—ranch, spicy mayo, or a squeeze of lemon for brightness. They should be tender inside with a crunchy exterior.
- Enjoy the crispy, cheesy aroma and the satisfying crunch with every bite—perfect for sharing, or just a treat for yourself.
Let the cauliflower bites rest on the baking sheet for 5 minutes. This helps set the coating and prevents sogginess. Serve hot, with dips on the side—preferably something tangy or spicy to contrast the crispy, cheesy bites.
How to Know It’s Done
- Color: Florets should be golden and crispy around edges.
- Texture: When tapped, they should sound crackly and feel firm but not hard.
- Appearance: Coating should be even and well-adhered, not soggy or greasy.
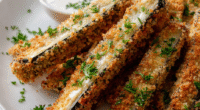
Crispy Baked Cauliflower Bites
Ingredients
Equipment
Method
- Preheat your oven to 200°C (390°F). Line a baking sheet with parchment paper or a silicone mat to prevent sticking.
- Cut the cauliflower into small, bite-sized florets, about 2-3 centimeters each. Rinse and thoroughly dry them to remove excess moisture.
- In a mixing bowl, whisk the eggs until they are frothy and slightly glossy; this helps the coating stick better.
- Add paprika, garlic powder, cayenne (if using), salt, and pepper to the eggs, then whisk again to combine everything evenly.
- In a shallow dish, combine panko breadcrumbs and grated Parmesan cheese for added flavor and crunch.
- Dip each cauliflower floret into the egg mixture, ensuring it is fully coated, then roll it in the breadcrumb mixture until evenly covered. Place each coated floret on the prepared baking sheet.
- Lightly spray or brush the coated cauliflower with oil to help it crisp up and turn golden in the oven.
- Bake for 20-25 minutes, flipping the cauliflower pieces halfway through. Look for a golden-brown color and a crackling sound when you gently shake the sheet.
- Remove from the oven and let the bites rest on the baking sheet for about 5 minutes to set the coating and prevent sogginess.
- Serve hot with your favorite dips—ranch, spicy mayo, or a squeeze of lemon—to complement the crispy texture and enhance flavor.
Notes
Tips for perfect baked cauliflower bites
- Bite-sized pieces: Ensure cauliflower florets are uniform for even baking and consistent crunch.
- Room temperature eggs: Use eggs at room temp for better emulsification and coating adhesion.
- Coating adhesion: Dip florets fully in egg wash, then press into breadcrumbs to lock in crunch.
- Oiling technique: Lightly spray or brush oil on coated cauliflower to achieve a golden, crispy shell.
- Baking temperature: Bake at 200°C (390°F) until golden and crackling, about 20-25 minutes, flipping halfway.
- Cooling time: Rest baked bites 5 minutes on the sheet to firm up the coating and prevent sogginess.
- Serving: Serve immediately with dips—hot, crispy, and aromatic—that make the crunch irresistible.
Common mistakes and how to fix them
- FORGOT to preheat oven → Always preheat to ensure even crisping.
- DUMPED too much oil → Use light spray or brush for crispness without greasiness.
- OVER-TORCHED cauliflower → Remove when golden, not burnt, for perfect texture.
- MISSED resting time → Rest 5 minutes to set coating and avoid sogginess.
Quick fixes and pantry swaps
- When cauliflower releases too much moisture → Splash with salt, let sit, then pat dry before coating.
- If coating isn’t sticking well → Dipped florets fully in egg, press into breadcrumbs firmly.
- When bites aren’t crispy enough → Increase oven temp slightly or bake an extra 5 minutes, watch closely.
- DUMPED too much oil → Use a light spray to prevent greasiness while still crisping up.
- When bites burn quickly → Reduce oven temperature to 190°C (375°F) and rotate halfway through cooking.
Prep, store, and reheat tips
- You can prepare the cauliflower florets a day in advance; keep them dry and refrigerated to preserve freshness and prevent sogginess.
- The coated cauliflower bites can be stored in an airtight container in the fridge for up to 2 days. Reheat in a hot oven or air fryer for crispness—expect a slight loss in crunch but still tasty.
- For longer storage, freeze baked bites in a single layer on a tray, then transfer to a bag. They’ll keep for up to 1 month and reheat well from frozen.
- Reheating in the oven at 180°C (350°F) for 8-10 minutes restores much of the original crunch. Keep an eye on them to avoid over-baking, which can dry out the cauliflower.
Top questions about baked cauliflower bites
1. How do I pick the best cauliflower?
Look for firm, bright white cauliflower with no brown spots. The smell should be fresh, not sour or musty.
2. Can I use egg substitutes?
Use large eggs for better coating adhesion. Whisk until frothy and slightly glossy before dipping the cauliflower.
3. What’s the best breadcrumb for crunch?
Panko breadcrumbs give the best crunch, but regular breadcrumbs work if toasted well first. For gluten-free, try almond or coconut flour.
4. How long do I bake them?
Bake at 200°C (390°F) until golden, about 20-25 minutes. Flip halfway to ensure even crisping and spray lightly with oil.
5. How should I store leftovers?
Store leftovers in an airtight container in the fridge for up to 2 days. Reheat in the oven or air fryer for best crispness.
6. Why are my bites soggy?
If bites aren’t crispy, increase oven temp slightly or bake an extra 5 minutes. For sogginess, ensure cauliflower is dry before coating.
7. How do I get them extra crispy?
Use a light spray or brush of oil before baking. It helps achieve that golden, crispy exterior without greasiness.
8. Can I make this vegan?
For vegan options, try flaxseed or aquafaba instead of eggs. They create a good binding, but the texture might differ slightly.
9. Can I prep these in advance?
Yes, you can prepare coated cauliflower a day ahead and keep refrigerated. Reheat in the oven for best texture.
10. What if they turn out soggy?
When cauliflower releases too much moisture, sprinkle with salt, let sit, then pat dry before coating to keep them crispy.
These baked cauliflower bites are more than just a snack—they’re a nostalgic trip back to simpler times, with that irresistible crunch and cheesy aroma. Making them at home lets you control the flavors and customize the spice level, which is a small victory in itself.
Whenever I make these, I think about how a humble vegetable can turn into something joyful and familiar. They’re perfect for any season or gathering, and honestly, they always disappear faster than I expect. That’s the quiet magic of a good, crispy bite.

