These baked vegetable cutlets are a quiet victory in my kitchen. They turn simple, often overlooked veggies into something crispy, hearty, and oddly satisfying without the greasy mess of frying. It’s a recipe I keep coming back to, especially when I want a quick, wholesome snack that feels a little indulgent but isn’t deep-fried.
What I love most is how flexible they are. You can toss in whatever vegetables you have, tweak the spices, and end up with a tender inside and a lightly crisp exterior. They’re perfect for lazy weekends or a last-minute veggie rescue mission, and the smell of roasting vegetables mingling with spices just fills the house with comfort.
These cutlets aren’t fancy, but they’re honest, unpolished, and deeply satisfying—something I suspect many of us need more of right now. They remind me that good food doesn’t have to be complicated, just honest and flavorful, with a little bit of crispy magic.
This recipe focuses on transforming humble, everyday vegetables into crispy, satisfying cutlets that feel like a treat, perfect for anyone who wants to elevate their veggie game without deep frying or complicated techniques.
The inspiration behind these cutlets
- This recipe came from a moment of kitchen chaos. I had a bunch of leftover roasted vegetables that I didn’t want to waste, so I mashed them up and started experimenting. The first batch was a bit too soft, but the next day, I realized baking them gave a nice crispy edge without any fuss. It’s become my go-to for turning odds and ends into something satisfying.
- One afternoon, I was craving something crunchy but healthy, and I remembered how my grandmother used to bake veggie patties, though hers were more fried and greasy. I wanted to keep that satisfying crunch but cut the oil. The oven did the magic, and now I have a recipe that feels like a little bit of nostalgia with a modern twist.
- heading
- story_type
Key ingredients and tips
- Carrots: I like to grate them finely for a natural sweetness and bright color, but you can also chop them for more texture—just watch for moisture, which can make the cutlets soggy.
- Potatoes: I prefer starchy potatoes to help bind everything together; mash them well until smooth. If you want a lighter feel, swap with sweet potatoes, but expect a sweeter flavor and softer texture.
- Onions: Finely diced onions add a punch of aroma and a touch of sweetness as they cook. If you’re sensitive to raw onion bite, sauté them until translucent first.
- Spices: I keep it simple with cumin and coriander, but a pinch of smoked paprika or curry powder can add smoky depth or warmth. Adjust to your taste, but don’t overdo it—let the vegetables shine.
- Breadcrumbs: I use panko for extra crunch, but regular fine breadcrumbs work fine if you want a softer crust. Toast them lightly if you want a nuttier flavor.
- Binder: I prefer a mix of chickpea flour or breadcrumbs mixed with a splash of water to help hold everything together. If the mixture feels too wet, sprinkle in a little more flour—no one wants a mushy mess.
- Oil: I lightly brush the cutlets before baking for a golden finish; a drizzle of olive oil gives a subtle fruity aroma and crispy texture, but you can skip it for a lower-fat version.
Spotlight on key ingredients
Carrots:
- I like to grate them finely for a natural sweetness and bright color, but you can also chop them for more texture—just watch for moisture, which can make the cutlets soggy.
- Potatoes: I prefer starchy potatoes to help bind everything together; mash them well until smooth. If you want a lighter feel, swap with sweet potatoes, but expect a sweeter flavor and softer texture.
- Onions: Finely diced onions add a punch of aroma and a touch of sweetness as they cook. If you’re sensitive to raw onion bite, sauté them until translucent first.
Potatoes:
- I prefer starchy potatoes to help bind everything together; mash them well until smooth. If you want a lighter feel, swap with sweet potatoes, but expect a sweeter flavor and softer texture.
- Onions: Finely diced onions add a punch of aroma and a touch of sweetness as they cook. If you’re sensitive to raw onion bite, sauté them until translucent first.
Notes for ingredient swaps
- Dairy-Free: Swap regular cheese for nutritional yeast or vegan cheese. Expect a slightly different melt and umami flavor.
- Gluten-Free: Replace breadcrumbs with crushed gluten-free rice cereal or almond meal for crunch and binding.
- Vegan: Use mashed chickpeas or lentils instead of eggs or cheese to hold the cutlets together. Expect a denser texture.
- Low-Sodium: Opt for fresh herbs and spices instead of salt or salted seasonings to keep flavor vibrant without the salt.
- Extra-Vegetable: Add grated zucchini or spinach for more moisture and nutrients, but squeeze out excess water first.
- Spice Level: Increase chili or black pepper for more heat, or skip them for milder, kid-friendly bites.
- Herb Variations: Swap cilantro for parsley or basil to change the fresh flavor profile. Keep in mind different herbs release aroma at different rates.
Equipment & Tools
- Oven: To bake the cutlets evenly and develop a crispy crust.
- Baking sheet lined with parchment or silicone mat: Provides a non-stick surface for baking and easy cleanup.
- Mixing bowl: To combine and mix all ingredients thoroughly.
- Spatula or spoon: To mix the ingredients and flip the cutlets if needed.
- Pastry brush or spray: To lightly coat the cutlets with oil for a golden crust.
Step-by-step guide to baked cutlets
- Preheat your oven to 200°C (390°F). Prepare a baking sheet lined with parchment paper or a silicone mat to prevent sticking.
- Gather your equipment: a large mixing bowl for combining ingredients, a spoon or spatula for mixing, a baking brush or spray for oil, and a spatula for flipping if needed.
- Chop or grate your vegetables finely—think carrots, zucchinis, potatoes—so they mash easily and bind well. Measure out about 2 cups of mixed vegetables.
- In the mixing bowl, mash the vegetables with a fork or potato masher until mostly smooth, leaving some small pieces for texture.
- Add 1/2 cup of breadcrumbs, 2 tablespoons of chickpea flour (or regular flour), 1 teaspoon of cumin, 1/2 teaspoon of coriander, and a pinch of salt and pepper. Mix thoroughly.
- If the mixture feels too wet and sticky, sprinkle in a little more flour until it holds together when pressed. If too dry, add a teaspoon of water. You want it to stick together without being mushy.
- Form the mixture into 8-10 flat, round patties about 1 inch thick. Place them on the prepared baking sheet, leaving space between each.
- Lightly brush each cutlet with olive oil or spray with cooking spray to encourage a golden, crispy exterior.
- Bake in the oven for 20-25 minutes. Flip the cutlets carefully halfway through, around the 10-minute mark, to ensure even browning.
- Look for a golden-brown color on the outside, a fragrant aroma of roasted vegetables, and a firm but tender texture when pressed lightly with a spatula.
- Once baked, let the cutlets rest for 5 minutes on the baking sheet to firm up before transferring to a plate.
Allow the cutlets to rest for 5 minutes after baking. Serve warm with your favorite chutney or dip, or let cool completely for storage.
How to Know It’s Done
- Outer surface is evenly golden and crispy.
- Interior feels firm but not dry, with no excess moisture.
- Vegetables are cooked through, with a fragrant aroma of roasted spices and vegetables.

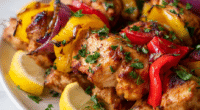
Baked Vegetable Cutlets
Ingredients
Equipment
Method
- Start by preheating your oven to 200°C (390°F). Line a baking sheet with parchment paper or a silicone mat for easy cleanup.
- Gather all your vegetables and finely grate or chop about 2 cups worth, aiming for small, uniform pieces that will mash together easily.
- Place the vegetables in a large mixing bowl, then mash or stir them until they’re mostly smooth with a bit of texture remaining. This helps them bind better.
- Add the breadcrumbs, chickpea flour, cumin, coriander, and a pinch of salt and pepper to the mashed vegetables. Mix everything thoroughly with a spatula or spoon until well combined.
- If the mixture feels too wet and sticky, sprinkle in a little more flour; if it’s too dry, add a teaspoon of water. Aim for a dough that holds together when pressed.
- Shape the mixture into 8 to 10 flat patties, about 1 inch thick, and place them evenly spaced on your prepared baking sheet.
- Lightly brush each cutlet with olive oil or spray with cooking spray to help develop a golden, crispy crust during baking.
- Bake in the preheated oven for about 20-25 minutes, flipping them carefully halfway through. Look for a deep golden brown and crispy edges.
- Once baked, remove the cutlets from the oven and let them rest on the sheet for 5 minutes. This helps them firm up and prevents crumbling when serving.
- Serve warm with your favorite dips or chutneys, enjoying the crispy exterior and tender interior of these wholesome veggie bites.
Pro Tips for Perfect Cutlets
- Bolded mini-head: Use a light hand when mixing to keep the vegetables from breaking down, preserving texture.
- Bolded mini-head: Chill your mixture briefly before shaping—this helps it hold together better during baking.
- Bolded mini-head: Lightly brush or spray the cutlets with oil before baking for a uniformly crispy crust.
- Bolded mini-head: Flip the cutlets carefully at the halfway point; use a wide spatula to prevent breakage.
- Bolded mini-head: For extra crunch, sprinkle a little extra breadcrumbs on top before roasting—watch for even browning.
- Bolded mini-head: Test for doneness by pressing gently—edges should be golden and firm, with a fragrant smell.
- Bolded mini-head: Rest the baked cutlets for a few minutes; this helps set the structure and keeps them from falling apart.
Common mistakes and how to fix them
- FORGOT to preheat the oven → Always preheat for even cooking and crispness.
- DUMPED the mixture directly on the baking sheet → Use a spatula to flatten for uniform thickness.
- OVER-TORCHED the cutlets → Reduce oven temp or shorten baking time, watch for golden edges.
- MISSED resting time → Rest 5 minutes to set texture and avoid crumbling.
Quick Fixes for Baked Cutlets
- When mixture feels too wet, sprinkle in more breadcrumbs to firm it up.
- Splash a little lemon juice if the cutlets smell flat before baking.
- Patch cracks by pressing the edges back together gently with a spatula.
- Shield delicate cutlets with foil if they brown too quickly during baking.
- If the oven smells smoky, rescue with a quick wipe and reduce heat slightly.
Prep, store, and reheat tips
- You can prep the vegetable mixture a day ahead; keep it covered in the fridge to preserve freshness and prevent drying out. The flavors meld beautifully overnight, making the final bake more fragrant and uniform.
- Baked cutlets will keep well in an airtight container in the fridge for up to 3 days. Reheat in a 180°C (350°F) oven for about 10 minutes until crispy and warmed through, watching for slight aroma of toasted breadcrumbs.
- For longer storage, freeze the baked cutlets in a single layer on a tray, then transfer to a zip-top bag. They stay good for up to 1 month. Reheat straight from freezer, adding a few extra minutes until golden and crackling.
- Reheating can sometimes soften the crust; to restore crispness, give the cutlets a quick blast under a broiler or in a hot oven for 3-5 minutes. Keep an eye on them to avoid burning the edges.
- The flavor may deepen slightly after refrigeration, developing a richer roasted aroma. If they seem a little dry upon reheating, a light spray of oil can help revive the crispy exterior and moist interior.
Top questions about baked vegetable cutlets
1. How can I tell when the cutlets are done?
Look for a golden-brown exterior that’s crisp and firm to the touch, with a fragrant roasted smell.
2. What texture should baked cutlets have inside?
They should feel firm but not hard, with a slight bounce when pressed, and smell roasted and savory.
3. How do I prevent soggy cutlets?
Use fresh, firm vegetables and avoid excess moisture by squeezing out water from grated veggies before mixing.
4. What’s the ideal baking time and temperature?
Bake at 200°C (390°F) for 20-25 minutes, flipping halfway, until they’re evenly golden and crispy.
5. Can I freeze these for later?
Yes, you can freeze baked cutlets in a single layer, then reheat in the oven for a crispy finish.
6. What are good substitutions for breadcrumbs?
You can swap breadcrumbs with crushed gluten-free cereal or almond meal, but expect a different crunch.
7. How do I vary the vegetables used?
Use finely grated carrots for sweetness and vibrant color, or chopped for more hearty texture.
8. What if the cutlets burn on top?
Over-torched edges turn bitter; reduce oven time or temp if this happens, and watch closely near the end.
9. Should I oil the cutlets before baking?
Brush lightly with oil before baking for a crisp, golden crust, or skip for a lower-fat version.
10. How do I fix a sticky or dry mixture?
If mixture is too wet, add more breadcrumbs or flour; if too dry, stir in a splash of water.
These baked vegetable cutlets are more than just a quick fix; they’re a reminder that simple ingredients can turn into something unexpectedly satisfying. The crispy edges and tender insides make them perfect for any season or mood, especially when you need a wholesome bite without fuss.
Sharing these with friends or family always feels special, even if it’s just a lazy weeknight dinner. They’re honest, imperfect, and built on a little bit of kitchen magic—no fancy tricks required. Sometimes, the best meals come from just tossing a few vegetables together and letting the oven do its thing.

